Scanning Sensors
Andrew Wilson, Editor
In many machine-vision and image-processing applications, it is necessary to measure the three-dimensional characteristics of an object. A number of different sensors, including structured-laser-light-based 3-D scanners, projected light stripe systems, and time-of-flight (TOF) sensors, can be used.
When these kinds of sensors are used in conjunction with robotic systems, accurate 3-D models of objects can be created, rendering systems capable of precision gauging of turbine blades, volume measurement of food reverse engineering, and medical applications.
Structured light
One of the more common techniques to digitize 3-D objects uses structured laser light. In one variation of this method, a laser line is projected onto the part and the reflected light digitized by one or more high-speed cameras. As the light is moved across the part, or vice versa, individual 2-D linescan images reveal surface profiles or range maps of the object. These can then be converted into Cartesian coordinates in the form of a 3-D point cloud and used to reconstruct a 3-D image of the object.
Many off-the-shelf structured light systems use a single laser and camera to perform this function. However, since the camera can only digitize information within its field of view, highly contoured objects can result in range maps with occlusions or shadow regions. It is therefore often necessary to use dual-camera systems that view the object from different angles. By registering and then merging the profiles from both of these cameras, a more accurate range map may be produced.
One example is a system developed by Aqsense to sort coconut shells. In this application, spherical shells needed to be sorted and graded in different range groups depending on their dimensions and volume. By using structured laser light to image the coconut shells as they pass along a conveyor, reflected data were captured by two cameras and the range data merged using the company’s Merger Tool software to minimize the occlusions that would have occurred using a single-camera system. A video of the system can be viewed at http://bit.ly/92KcnK.
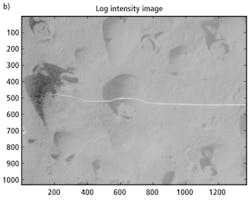
When mounted on robots, 3-D scanning systems can provide 3-D parts data for applications such as undersea exploration, inspecting very large parts, and robotic pick-and-place machines. At the University of Rhode Island’s Department of Ocean Engineering, assistant professor Chris Roman has outfitted a Hercules remotely operated vehicle (ROV) with a structured-laser-light imaging system to create high-resolution bathymetric maps of underwater archaeological sites (see Fig. 1).
Using a 1024 × 1360-pixel, 12-bit camera from Prosilica (now part of Allied Vision Technologies), arranged in a downward looking configuration, the ocean floor is illuminated with a 532-nm Lasiris laser from Coherent with a 45° spreading lens to produce a single thin beam of laser light. The laser line is then extracted from the black-and-white camera images and used to produce a 3-D model of the ocean floor.
The systems developed by Aqsense and Roman use separate lasers and cameras to perform this task; combined projection and camera systems are available to perform this same task. One of the benefits of using such products is that since the laser source and camera are housed in a single unit, the laser and camera unit are precalibrated.
A pick-and-place product, the IVC-3D from SICK IVP has recently been deployed by ThyssenKrupp Krause, a manufacturer of turnkey power-train assembly systems for automotive manufacturers. Mounted on a robot from ABB, the system is programmed to scan a number of parts including engine blocks, cylinder heads, and transmission housings. After a 3-D position model of the object is created, the camera determines the approach coordinates of the robot, which then picks and places the product into a pallet.
Light projection
While data from structured-laser-light scanners can be used to generate the most accurate 3-D models, other methods do exist. Structured-laser-light methods project a single scanning laser stripe over the object to be imaged. A faster method is to project and process a series of multiple stripes using a calibrated camera and visible light projector system.
In these systems, a projector—often based on Texas Instruments' digital light projector (DLP) IC—is used to project a series of intensity patterns onto the scene of interest. In such systems, every pattern is shifted by a fraction of its period with respect to the previous pattern to cover the entire period. Reflected phase-shifted images are then captured by the camera, the relative phase map of the image calculated, and the coordinates of surface points in the image computed.
Like their structured light counterparts, these scanners can be used in standalone configurations or coupled to a robot for digitizing a wider perspective of 3-D objects. Last year, 3D Dynamics demonstrated how its Mephisto system was used to digitize biological samples that are either dried in wax or conserved in formaldehyde (see “Off-the-shelf cameras and projectors team up for 3-D scanning,” Vision Systems Design, February 2010).
Using a DLP from InFocus, low-resolution phase-shifted images were projected across the samples and captured using a 1920 × 1080-pixel, CCD-based Pike F210B FireWire camera from Allied Vision Technologies. As these images were captured, a 12-Mpixel EOS DSLR consumer camera from Canon was also used to transfer sub-pixel data from sinusoidal patters projected across the phase-shifted images. Data are then transferred to the host PC and images reconstructed in 3-D.
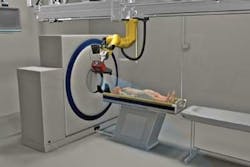
Researchers at the University of Bern’s Institute of Forensic Medicine have taken this concept further, developing a system known as Virtobot to perform virtual autopsies (see Fig. 2). Michael Thali and his colleagues have used a Tritop Atos III, a combined light projector and scanner from GOM attached to a robot from Fanuc to project a light bar onto the corpse being examined.
Imaged body contours are recorded using the scanner while a visible wavelength camera system simultaneously records images of skin textures. These surface images are combined with 3-D CT data of the corpse, providing forensic doctors with 3-D images of the corpse. Thus, for the first time, cadavers can be digitally preserved and autopsies conducted again, even years later. A video of the system can be viewed at http://bit.ly/cJTZbj.
Time of flight
Alternative approaches to structured laser light and visible light projection use TOF systems that use integrated light sources and cameras to capture 3-D data. Range measurements are based on the TOF principle, in which a pulse of light is emitted by the laser scanner, and the time taken for it to be returned is recorded. Using the known constant speed of light, the range to the target can be calculated. To perform 3-D scans of wide areas, companies such as Riegl have developed scanners that provide vertical deflection of the laser using a rotating polygon with a number of reflective surfaces. Horizontal frame scans are then obtained by rotating the optical head 360° (see Fig. 3).
FIGURE 3. Laser-based time-of-flight scanners such as Riegl’s LMS-Z series perform 3-D scans of wide areas by vertically deflecting the laser using a rotating polygon with a number of reflective surfaces. Horizontal frame scans are then obtained by rotating the optical head 360°.
Using Riegl’s LMS-Z series of laser scanners attached to a 3D-R1 remote operated survey vehicle developed in partnership with Jobling Purser, 3D Laser Mapping has created a 3-D map of the San Jose silver mine in Mexico. After capturing approximately 99.36 million data points, the data were then processed to create a 3-D plan of the mine, allowing existing mine drawings to be replaced with geometrically accurate plans.
Recently, other types of TOF scanners have been developed that measure the phase difference between a modulated light signal transmitted and received by the scanner, rather than measuring the TOF of the light. Devices such as the O3 3-D camera from PMD Technologies use an array of modulated LEDs to illuminate the scene and the company’s patented smart pixel architecture to measure the phase delay from which 3-D data can be obtained (see “Video range camera provides 3-D data,” Vision Systems Design, September 2006).
Both PMD Technologies and ifm efector have developed cameras based around this technology; the latter recently demonstrated a system designed to measure the dimensions of a pallet as it sat under a 7-ft gantry. Measuring an area of approximately 6 × 4 ft, the system could resolve a minimum object size of 1 × 1 in. (see “3-D measurement systems verify pallet packing,” Vision Systems Design, September 2009).
Such TOF sensors can also be mounted on robots to provide 3-D guidance. GEA Farm Technologies has worked with LMI Technologies to adapt its Tracker 4000 3-D TOF ranging imager to develop a robotic system for milking cows (see “Got milk,” Vision Systems Design, July 2009). The vision sensor is mounted on the actuator end of a robot arm and allows simultaneous verification of the milking cup position and the cow’s teats. This allows the milking cups to be automatically placed by the robot.
Company Info
3D Dynamics
‘s Gravenwezel, Belgium
www.3ddynamics.eu
3D Laser Mapping
Bingham, UK
www.3dlasermapping.com
ABB
Zurich, Switzerland
www.abb.com
Allied Vision Technologies
Stadtroda, Germany
www.alliedvisiontec.com
Aqsense
Girona, Spain
www.aqsense.com
Canon
Tokyo, Japan
www.canon.com
Coherent
Santa Clara, CA, USA
www.coherent.com
Fanuc
Yamanashi, Japan
www.fanucrobotics.com
GEA Farm Technologies
Bönen, Germany
GOM
Braunschweig, Germany
ifm efector
Exton, PA, USA
www.ifmefector.com
InFocus
Portland, OR, USA
www.infocus.com
Jobling Purser
Newcastle Upon Tyne, UK
www.joblingpurser.com
LMI Technologies
Delta, BC, Canada
www.lmitechnologies.com
PMD Technologies
Siegen, Germany
www.pmdtec.com
Riegl
Horn, Austria
www.riegl.com
SICK IVP
Linköping, Sweden
www.sick.com
University of Bern, Institute of Forensic Medicine
Bern, Switzerland
www.irm.unibe.ch
University of Rhode Island, Department of Ocean Engineering
Narragansett, RI, USA
www.oce.uri.edu
Vision Systems Articles Archives


