Software seeks to minimize false positives in machine-vision inspection systems
As sophisticated as today’s machine-vision software is, there is no guarantee that an algorithm or series of algorithms once developed will ensure 100% inspection of every part. To improve the quality of these inspection processes, manufacturers have adopted Six Sigma tactics to reduce the amount of defects while at the same time minimizing the variability of their finished products.
Processes that operate with this Six Sigma quality reduce the number of defects in manufacturing processes to below 3.4 defects per million by reducing the number of good parts that are erroneously rejected (false rejects) and bad parts that are similarly accepted (false accepts). Developers of machine-vision software use a number of manual and automated techniques to decrease the number of parts that are falsely accepted or rejected by the system.
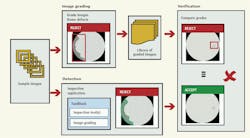
As with many automated processes, such tools must be able to handle both the variability of defective features that may appear on a part as well as compensate for any process or part variation that may occur. In its latest release of VisionPro 7.0 vision software and In-Sight 4.5.0, Cognex (Natick, MA, USA) has developed two tools designed for this purpose. The first, VisionPro Inspection Designer, is designed to allow system integrators and their customers to more clearly define what does and does not constitute a defect and to accommodate future part variability without sacrificing factory-qualified performance. VisionPro Inspection Designer enables the system developer to compile a database of known good and bad parts from samples supplied by the manufacturer.
Known good and bad parts can be classified by any number of machine-vision algorithms such as edge detection, morphological operators, and geometric pattern matching that are part of the VisionPro 7.0 library.
In pharmaceutical inspection, for example, it may be necessary to inspect pills for any possible contamination that may have occurred during manufacture. Following this scenario, a morphological operator may be run over the part and any number of images classified with its type of defect, the region of the defect, and its source (see figure). After sample images are classified and stored in the database, the same image-processing algorithm can be run on a series of unclassified test samples. When compared with the existing database, this may result in a number of false positives and negatives.
To reduce the occurrence of false results, the system developer can reclassify the images, adding them to the image database for later reference. By doing this, the system developer manually tailors the system to decrease the number of incorrectly rejected parts. If new examples are added to the database over time, plant quality-assurance engineers can adjust the vision system to handle the new cases, while confirming that the initial examples still produce the correct results.
Although these tools can be used to find defects, they cannot be used to compensate for any positional errors that may occur when the part is presented at the inspection station or any lens or perspective distortion that may occur within the imaging system.
For this reason, Cognex has also added what it calls a Flexible Flaw Detection tool to the latest version of In-Sight 4.5.0, which runs on its smart camera vision systems. This allows the user to first train the system using a known good part or golden template.
Geometric pattern matching is used to compare the features of the known good part with a test image to find any defects. To compensate for any variations such as perspective distortion that may occur between these images, the geometric-pattern-based model can be “flexed” in a number of different ways, for example, to find extra edges in an image that were not present in the model.
Depending on the application, the Flexible Flaw Detection tool may be used with Cognex In-Sight vision systems, or Cognex’s VisionPro Inspection Designer can be used to support the system developer with the benefits of defect detection, reduced false acceptance rates, and any part position errors that may occur.
-- By Andrew Wilson, Vision Systems Design
