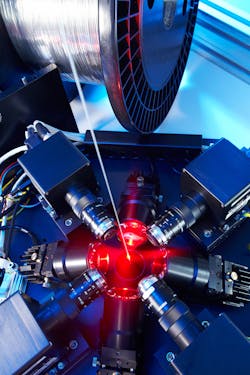
Fraunhofer researchers develop high speed wire inspection system
Researchers from the Fraunhofer Institute for Physical Measurement Techniques IPM have developed an optical inspection system that checks parts and pieces at 10 meters per second and locates defects as narrow as a single hair.
The WIRE-AOI system is able to identify defects in strip products such as pipes, rails wires, or boards, in real time at high flow velocities. In order to capture these defects, the system uses LED lighting developed by the Fraunhofer team, along with four high-speed cameras, each of which is capable of shooting 10,000 images per second and processing them in real-time. Though the Fraunhofer news release does not explicitly name the type of camera the system uses, a close up of the image provided indicates that the cameras used were more than likely custom Eye-RIS Vision System-on-Chip cameras from Anafocus. Assuming this is correct—which, by way of matching logos, it would seem that it is—the Eye-RISCMOS vision sensor the system used features a 176 x 144 monochrome pixel array with proprietary pixel architecture that combines image sensing with configurable image processing and storage.
Dr. Daniel Carl, group manager for Inline Measurement Techniques at IPM, said in the release that only a handful of industrial cameras are able to recognize this number (10,000 fps) of images, much less analyze them in real time.
“Prerequisite for this peak performance are cellular neuronal networks. “That means each pixel is itself a computer in its own right. In order to program these, you need specialized knowledge about parallel architectures that the team at IPM has at its disposal,” he said of the vision sensor.
Fraunhofer’s WIRE-AOI in-line inspection system detects micro-defects that zoom past at 10 meters per second, and when workers see the processed defects depicted on a monitor, they are able to remove those pieces. The system then marks the location of the defect and stores the associated image in a database in order to document different types of defects during production.
The system will be on display at the Control show from May 6-9 in Stuttgart.
View the Fraunhofer news release.
Also check out:
Image Sensors: Novel sensor designs tackle multispectral applications
Optical sensor increases spot welding efficiency for automated spot welding system
Camera and laser system measures wind turbines
Share your vision-related news by contacting James Carroll, Senior Web Editor, Vision Systems Design
To receive news like this in your inbox, click here.
Join our LinkedIn group | Like us on Facebook | Follow us on Twitter | Check us out on Google +
About the Author

James Carroll
Former VSD Editor James Carroll joined the team 2013. Carroll covered machine vision and imaging from numerous angles, including application stories, industry news, market updates, and new products. In addition to writing and editing articles, Carroll managed the Innovators Awards program and webcasts.

