METROLOGY: Software compensates for lighting nonuniformity
Solar cell inspection systems often require numerous features to be measured simultaneously using single cameras. At Owens Design (Fremont, CA, USA; www.owensdesign.com), a solar cell inspection system has recently been developed to check part distance measurements and their orientation, features, and blemishes. During system design, a smart camera was used to perform seven separate visual inspections on six different parts.
During the development phase, the camera, software, and lighting were set up to inspect product samples. To enhance and inspect the edges of the product, off-axis illumination was used and images captured using an In-Sight smart camera from Cognex (Natick, MA, USA; www.cognex.com).
Unfortunately, close to deployment, a change in product materials meant that although the camera could perform six of the inspection tasks, surface features could not be easily measured because a lack of uniform illumination compromised the contrast of the captured images. Essentially, the camera lacked a means of flattening the visual field so the illumination appeared uniform across the entire area being inspected.
Other cameras were considered for the application, but they could not be used for a number of different reasons. First—and most important—the client had specified the Cognex In-Sight camera because of its low integration cost, factory support, and a desire to use a standard vision supplier across multiple applications.
Second, other smart cameras were either not powerful enough, were difficult to deploy, or lacked sufficient technical support. Last, while it would have been possible to adjust the lighting and perform a second inspection of the part, this would have doubled the number of inspection passes and required recalibrating the camera. Since these alternatives were unacceptable, it was decided to compensate for the lighting nonuniformity by using software.
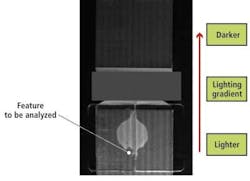
Due to the lighting nonuniformity, the camera was unable to successfully measure the area of a tack used to mechanically attach parts of the solar cell together (see Fig. 1). This task is important because measuring the area of the tack indicates the strength of the attachment. Since the tack has a different grayscale value than the rest of the part being viewed, a smart camera should be able to find and measure its area. Unfortunately, illumination variation across the tack area made it impossible to first set a correct grayscale threshold value. Without such a value, the area of the tack could not be automatically segmented from the rest of the image.
In the raw image captured by the camera, the illumination varies from brighter at the bottom to darker at the top. While the tack region is discernable, the grayscale difference between the area and its background is very small.
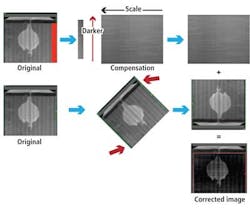
To solve the problem of lighting nonuniformity, a simple yet elegant software solution was developed (see Fig. 2). First, a featureless portion of the image, containing the lighting gradient was extracted from the original image (top, left). This sample (shown in red) was then scaled in the x direction to be as wide as the part (top, middle). The original image was then rotated 180° so the illumination was darker at the bottom and lighter at the top (middle images).
Finally, the expanded sample region (top right) was added to the reversed image (middle, right). Combining the reversed image where the lighting gradient runs darker to lighter from top to bottom with the expanded sample image then corrects the illumination gradient for the tack area (bottom, right image). Additional coding was used to apply a grayscale offset to restore the 8-bit image data.
Once this compensation was applied, detection of the tack became very robust. In addition, since this correction can be performed dynamically, it can correct for time-varying lighting or different parts or materials.
Such nonuniformity lighting compensation resolved the inspection issue, making it possible to meet the client's deployment schedule and provided an easy, low-cost solution that can be used in similar inspection applications.
—By Hans Hansen, senior systems design engineer, Owens Design (Fremont, CA, USA)
Vision Systems Articles Archives


