Industrial Inspection: Vision system inspects injection molded tube shoulders
Engineers at the VISTION d.o.o. company (Ljubljana, Slovenia; www.vistion.si), along with its client the SIBO GROUP (Skofja Loka,Slovenia; www.sibo-group.eu) have developed a machine vision system for inspecting injection-molded tube shoulders for short shot molds.
"Such defects occur when the plastic mass in the mold does not develop the correct roundness," explains Rok Mihelj, Co Founder Vistion d.o.o. "Injection problems of tube shoulders happen at random and result in short shot caps, which are highly undesirable and often result in complaints."
The goal was to retrofit the machine vision solution directly on the machine's tools for plastic molding to save production space. Since tubes are not sorted after being ejected from the molding machine, implementing a purpose-built inspection machine would not only take up additional space, but would further increase costs by requiring tube-shoulder sorting and singulation for inspection.
After preparing machine plans and creating custom bracket holes, four BFLY-PGE-50A2C-CS cameras from FLIR Integrated Imaging Solutions (formerly Point Grey, Richmond, BC, Canada; www.ptgrey.com) were mounted directly on a VICTORY 180 molding machine from ENGEL (Schwertberg, Austria; www..engelglobal.com). With a resolution of 2592 x 1944 pixels and a frame rate of 13 frames per second, the cameras are powered using PoE - Power Over Ethernet and connect via 4x10Gbit connection to a powerful VISTION industrial PC with a 3120ix Intel Core i7 (3.3 GHz), 4 GB of DDR3 ram and a 256 GB SSD solid state drive, which controls the cameras and illumination.
The biggest challenge with integrating the solution on an existing injection molding machine were proper lighting and camera placement on the molding machine's tools. In operation, lighting and image acquisition are synchronized with machine operation to strobe and acquire images while the machine opens between molding cycles. The system inspects the structural integrity of either 48 or 64 caps inside the mold at 10 second intervals, and proper camera placement is vital to get acceptable pictures because of the large number of workpieces in the machine.
Another integration challenge was dealing with various vibrations that occur in industrial environments, as well as vibrations caused by the molding machine itself. "Vibrations transferred to the camera and caused blurry images," notes Mihelj. "We solved the vibration problem with a more solid, load-bearing, camera mount, and developing algorithms to smooth out molding machine motion profiles."
Correct selection and placement of lighting with an optimum color spectrum was also a challenge. According to Mihelj, standard solutions that check workpiece nesting already use infrared spectrum lighting to prevent glare. "Our goal was to develop a system which would still produce satisfactory results in the visible spectrum."
Glare can cause system instability because the system can detect abnormalities on workpieces even when they are up to standard. "We managed to remove glare with precise installation of lighting on the tools and with adequate software filters," says Mihelj. There are various types of lighting available on today's market such as parabol and coaxial lights which lessen glare but none of these were suitable for this application, according to Mihelj. "We must note, that our system is also capable of diagnosing different types of workpieces which have defects in the visible spectrum. We used our own lighting V-bar with 12 W power. The LED lights turn on when the tool is fully open and ready for inspection. The LED lights turn off right after inspection is finished. They turn off to save energy and increase the lifespan on the LED lights."
The software runs on the Ubuntu 14.04.4 LTS operating system and was developed fully by the VISTION d.o.o. company. "Our software provides our client cost savings on the operating system, development environment, maintenance, user interface, software upgrades and communications," says Mihelj.
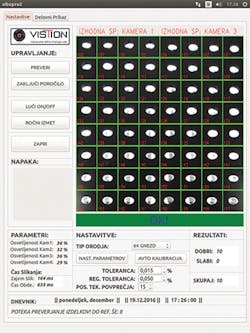
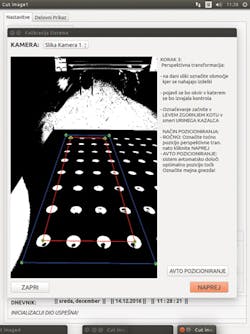
Tube shoulder proofing comprises several steps, the first of which is to capture four high resolution images. The next is perspective transformation where the acquired image is stretched out by help of interpolation. The transformed pictures are then cropped and are thus prepared for the threshold method - this method is used to check the number of white pixels on every picture for each nest.
If the nest has a sufficient number of pixels, it is considered up to standard. In the case of missing pixels, the nest is colored red which signals the machine that a shoulder tube error check has occurred. The machine operator gets all the necessary information regarding current nest results as well as all the final results. It is also possible for the operator to stop the nest operation on demand or if some error occurs.
The software is custom made and enables several different points of view of input pictures as well as after transformation pictures. It is possible to further change the system sensitivity for nest checking. Tolerance management is possible by two parameters - the first is the maximum nest deviation while the other is called regional tolerance and describes the tolerance increase based on the distance from the camera. These parameters can be adjusted via software for error proofing. In the event of tool change it is also possible to calibrate the software and set the region of interest.
The tube shoulder image capture and analysis time takes between 0.65 to 1.3 seconds. After the analysis is completed a signal for the continuation of the manufacturing process is sent onward. The different processing times are influenced by parameters such as image flow field, recurring capture and analysis. If a nest error is detected on a captured image, the system recaptures an image to calculate and confirm the error. The detected error is highlighted in red. It is evident when the system for error detection has discovered a slight error which is sent onward to the molding machine to halt the series production.
The shoulder tube testing system provides a cost-efficient control solution, requires no workpiece manipulation, offers high system flexibility, workspace efficiency, fast integration, minimal time cycle change, robust system performance and possible mold workpiece supervision. "By adjusting error detection sensitivity, a 0.02% tolerance was achieved, which is acceptable for stable system proofing," concludes Mihelj.


