3D imaging technology inspects hard-to-reach spaces
With recent developments in fiber-based optical 3D metrology, the scope of 3D imaging applications has been expanded to include hard-to-reach spaces such as tubes and bores.
3D imaging can be accomplished in various ways, including single and multi-camera methods, structured light systems, laser triangulation, pattern projection, and those based on the Time of Flight principle. 3D vision systems such as these add a new dimension to machine vision systems, bringing the development of new applications for industry.
Advances in high-speed fiber-based low-coherence interferometry, a high-resolution 3D measurement technology, have resulted in the development of new in-line inspection applications. One company developing non-contact 3D metrology systems utilizing this technology is Novacam Technologies, where I visited this past November.
Based in the Montreal suburb of Pointe-Claire, QC, Canada, Novacam designs and manufactures high-precision optical metrology systems for 3D non-contact inspection and imaging. One of the company’s latest developments is RS2 (Rotational Scanner 2), a new version of its non-contact rotational scanner and a key component of the company’s modular BoreInspect system.
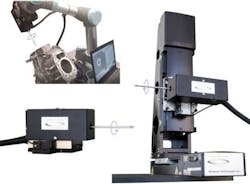
The RS2 spins a non-contact side-looking optical probe at up to 1,800 RPM inside hard-to-reach spaces such as bores to acquire their complete inner surface dimensions at 30,00 3D points per second. For example, this scanner is able to acquire 3D inner diameters (IDs) of several bores in a valve body as part of a fully-automated digital inspection application.
"We had been working on providing the capability to measure and image the insides of tubes and bores for a couple of decades. We saw the need for this type of measurement in many industries. Our first successful product to address this challenge, TubeInspect, involved a small-diameter side-looking probe measuring the internal diameters (IDs) of rotating tubes" said Vuk Bartulovic, President, Novacam. "For many clients this was the long-awaited answer. But others needed to measure bores inside workpieces that are stationary and cannot be rotated."
"So, we worked on developing a rotational scanner – now called RS - that spins the optical probe in the bore. We introduced BoreInspect recently," said Bartulovic, "and it is now being installed for in-process measurements on manufacturer production lines. RS2 enables the checking of features on hard-to-reach surfaces as part of in-process inspection. People tend to appreciate the metrology solutions offered by Novacam because even if a surface is slanted or skewed, the sensitivity of the underlying technology enables our system to obtain good measurement results", he noted.
"We adapt our solutions based on the needs of our customers to have parts measured. The need for micron-resolution 3D surface measurements in hard-to-reach spaces is quite large. In many cases, we get a sample from the customer and deploy one of our standard solutions and can get a measurement quite fast."
He added, "The recurring theme is that people have been looking for a long time for a solution that can make these measurements."
In a January 2018 Vision Systems Design magazine article, Bartulovic further explained the value proposition of the BoreInspect system, which is being used for automated inspection of bore holes.
"By the time they come to us, many of our clients have spent a long time looking for a way to measure, in a non-contact manner, internal diameters of bores, cylinders, barrels, and other such hard-to-reach spaces. These bore diameters range from a few millimeters to as large as truck engine cylinder bores," he said.
"Typically, he continued, "they want to acquire full internal diameter dimensions, detect defects, and measure roughness. It is a revelation to them that an instrument exists that can provide all this functionality … and that micron-precision data on their bore ID can be acquired in a matter of seconds and in a non-contact manner."
Looking toward what the future may hold for the company, Bartulovic was excited and optimistic, particularly about some of the advances he has seen within the market.
"We are always excited about the future because our company has something (in terms of technological capabilities) that many other companies do not have or offer. Also, at the Automate show 2017, for example, we saw robots’ capabilities that are now much more advanced and matured, and it looks like we may have an exciting future within this area since the RS have been installed as robot end-effectors in automated production lines."
Pictured: The BoreInspect performs in a wide range of industrial inspection applications and settings (bottom left: its rotational scanner RS2 on linear stage, top left: RS2 on a robotic arm, right: RS2 on a 3-axis inspection station).
View more information on Novacam.
Share your vision-related news by contacting James Carroll, Senior Web Editor, Vision Systems Design
To receive news like this in your inbox, click here.
Join our LinkedIn group | Like us on Facebook | Follow us on Twitter
About the Author

James Carroll
Former VSD Editor James Carroll joined the team 2013. Carroll covered machine vision and imaging from numerous angles, including application stories, industry news, market updates, and new products. In addition to writing and editing articles, Carroll managed the Innovators Awards program and webcasts.
