Smart sensors vie for vision applications
Smart sensors can provide the functionality needed for simple, low-cost machine-vision applications.
By Andrew Wilson, Editor
Used to mitigate the impact of human error in manufacturing, error proofing improves the overall quality of both products and manufacturing processes. “Error proofing,” says Rick Bondy, field marketing product manager with Sick USA, “is a systematic process for improving the reliability, quality, and stability of manufacturing methods.
“In factory-automation applications,” Bondy continues, “this process can be defined as the use of noncontact sensors to ensure that specific quality processes have been followed to minimize the possibility of human error.” To do so, many system integrators, possibly unfamiliar with developments in CCD cameras, frame grabbers, and third-party OEM software, are turning to more established vendors of industrial-automation equipment for help.
For years, system integrators have deployed limit switches and IR and LED sensors with which to detect the presence or absence of a part on a production line or used light grids to perform tasks such as profile detection, object recognition, overhang control, and height measurement. While these products are used to determine part presence, a host of laser-based triangulation products are now available that can precisely judge the position of the part, often to an accuracy of 0.1 µm.
These products are not emerging from “smart camera” vendors (seeVision Systems Design, September 2006, p. 45). Instead, they are being developed by companies more closely aligned to the automated manufacturing industry. Rather than provide general-purpose programmable cameras with OEM software, these vendors are specifically tailoring low-cost products designed to address specific machine-vision applications. In doing so, these products are challenging traditional vendors such as Cognex for a share of the parts-presence and measurement market.
While many of these smart sensors may not offer the sophistication of high-end machine-vision systems based around off-the-shelf cameras, frame grabbers, and PCs, they are increasingly being used in applications that do not require a high level of programmable image-processing applications. Although these products may embed a variety of sophisticated image-processing algorithms within, only the functionality of these devices is presented to the system integrator.
By hiding the intricacies of image-processing techniques while offering Ethernet, digital I/O, and easy-to-learn “teach” modes and user interfaces, smart sensor vendors are targeting their existing customer bases. Today, smart sensors are addressing important tasks including distance measurement, parts presence, color measurement, Data Matrix reading, pattern-matching, and three-dimensional (3-D) part profiling.
Distance measurement
When performing simple distance-measurements functions, low-cost laser-based displacement sensors can prove most effective. Today, a number of companies including Banner Engineering, Keyence, and Omron offer these products.
Comprising a semiconductor laser and a position-sensitive detector, these sensors use triangulation methods to determine object-to-sensor differences. As the laser light reflects from the target, it is reflected back to the detector, and the position of the object from the detector is determined by detecting the position of the beam spot on the detector. In a stationary mode, the sensors can accurately measure the distance of an object from a target. When used with conveyor-based systems, such sensors can generate surface-height profiles of products as they move along the conveyor.
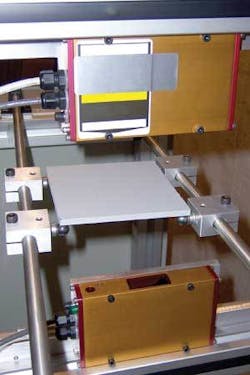
Thickness measurement can also be performed using two opposing laser displacement sensors. By aiming sensors at the opposite sides of an object, computing the distance measurements of both laser readings and the separation between the laser sensors yields the thickness of an object (see Fig. 1). Such a system has been developed by Laser-view Technologies for a manufacturer producing plates of various contours.
Using noncontact laser measuring sensors, Laser-view engineers chose two Acuity AR600 displacement sensors from Schmitt Measurement Systems to perform this task. With sampling speeds up to 1250 samples/s, the optical sensors include a background light elimination feature (BLE) that takes sample measurements with the laser on and off to eliminate the effects of ambient light and improve the accuracy of the readings.
While laser displacement systems offer an easy way to perform simple distance measurements, conventional photoelectric sensors are not always suitable for applications where object surfaces may vary, change, or reflect light poorly causing unstable detection. For many applications, however, a complete machine-vision system consisting of separate cameras, frame grabbers, or an embedded machine-vision system is not economical. In these applications, deploying smart vision sensors is the correct choice.
Pattern-matching
“While photoelectric sensors offer lower-cost alternatives, traditional smart cameras and machine-vision systems offer a higher level of performance but are more expensive,” says Ernie Maddox, product manager at ifm efector. Recognizing the need to address less complex applications such as Data Matrix reading and part profiling, industrial sensor vendors are offering smart sensors with simple programmability, PLC interface capability, and Ethernet compatibility.
For example, Cognex offers a range of products that address these different markets, including the company’s Checker and In-Sight series of vision sensors. In August 2006, the company announced the latest release of its spreadsheet-based In-Sight Explorer software (Version 3.3) for its In-Sight vision sensors. As well as including calibration and communication functions, the software includes the company’s PatMax geometric pattern-matching software, a tool especially useful for rapid part location in robot-guidance applications. The effectiveness of geometric pattern-matching has also been recognized by other vendors, most noticeably Adept Technology, DALSA, Matrox Imaging, and Stemmer Imaging, which offer this functionality as part of their machine-vision software toolkits (seeVision Systems Design, September 2005, p. 21).
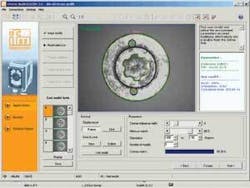
In the near future, ifm efector will also embed the algorithm into its smart sensor dubbed the Efector Dualis (see Fig. 2). In operation, the sensor uses incident light or backlight to detect the contours of an object and compares them with the contours of one or several models in a reference image. Depending on the degree of conformity, a result is output if a specific model is found. “By defining the search zone, only the area of interest is evaluated during the inspection,” says Maddox. “This is particularly useful if there are already several individual objects in the current image section.”
Color checking
While many intelligent vision sensors are tackling parts-positioning problems such as these, others are focusing on more niche application areas such as color inspection, object inspection, and reading Data Matrix code. Unlike a more programmable vision system, these smart sensors may be limited in their functions, performing simple color-checking tasks or barcode reading functions. However, by offering ranges of products targeted to each application, manufacturers expect to gain market share where simple machine-vision tasks must be performed.
Recently, a number of companies including Keyence, Panasonic, and Siemens have introduced low-cost smart sensors that are primarily aimed at determining the specific color of a part. Combining lighting, optics, image acquisition, and processing power in compact units, these products can be used with little or no experience with machine vision to teach known colors from a good part, extract color features in different color spaces, and compare these models with images of objects being detected.
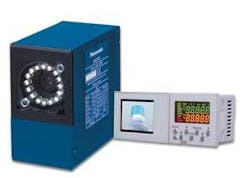
Panasonic’s LightPix AE20, for example, is equipped with a CMOS color sensor and a dedicated RISC CPU that lets the unit perform a number of color image-processing functions such as color area measurement, color differentiation, and color pattern-matching at a rate of 30 ms (see Fig. 3). During setup, the unit’s USB interfaces to a PLC to allow programs to be developed and uploaded to the smart sensor. Once results are calculated, they can be transferred to a PLC via the LightPix AE20’s parallel I/Os, serial RS-232C interface, or directly to the company’s GT11 touch terminals.
Structured lighting
Although applications such as parts-presence detection, barcode inspection, and color product identification can be performed with smart sensors that incorporate two-dimensional visible light imagers, more sophisticated sensors are incorporating one or more sensing techniques to provide 3-D data about parts being inspected. While structured-light techniques have long been used to extract depth information from scenes, it is only recently that companies such as SICK IVP have combined structured laser lighting, cameras, and computer into single image sensors to perform these tasks. Using devices such as Sick’s IVC-3D, automated systems can detect and compute 3-D geometrical features of objects, as well as control an external machine, robot, or conveyor without the use of an external PC (see Vision Systems Design, July 2005, p. 18).
At the recent AIA Vision & Robots for Automotive Manufacturing workshop (October 2006; Novi, MI, USA), both Servo-Robot Corporation and Meta-Scout described their latest structured-light-based image sensors. What perhaps makes both sensors unique is that they combine data from a number of sources to provide feedback to a robot. While Servo-Robot’s Robo-Pal combines ultrasonic detectors for long range detection and a structured light sources for short range detection, Meta-Scout’s M300 Sensor comprises multiple structured laser light sources and a miniature video camera.
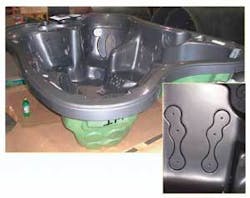
Both detectors are targeted at applications such as weld seam analysis where three-dimensional profiles of weld joints must be accurately determined. In a recent application for a hot-tub manufacturer, Servo-Robot deployed the Robo-Pal sensor to measure the surface plane of the tub allowing a robot to drill dimple holes perpendicular to the surface (see Fig. 4).
Companies with experience in automated manufacturing are now entering the machine-vision market with products that range from simple sensors for detecting colored objects to vision sensors for specific image processing applications, smart cameras, and PC-based image-processing systems. Products that are “trained” rather than programmed will surely impact the markets once dominated by Cognex and other smart camera/sensor vendors. To compete, these companies may need to pursue smaller, more niche markets that are not so closely aligned with industrial automation.
null
