3D Imaging Detects Defects in Railroad Rails
Researchers at Northeastern University in Shenyang, China, devised a stereoscopic visual system to inspect railroad rails at the end of the manufacturing process.
To do this, they acquired 2D images and 3D profiles of rail surfaces at a high speed and high resolution. They described their imaging method in a journal article, “Unsupervised Saliency Detection of Rail Surface Defects Using Stereoscopic Images” (https://bit.ly/3Kf5pOI).
Detecting defects in the plane and depth of rail surfaces is not easy because of the complexity of the rolled surface of the rail, randomness of the defects, harshness of the manufacturing environment, and need for a continuous inspection system, the researchers wrote.
Both 3D profile imaging and structured light combined with line-scanning stereo matching are common methods of inspecting surfaces. However, the researchers write, these methods have issues: the quality of the imaging information is impacted by lighting and shooting angles, low-texture defects are hard to detect on a similar background, and grayscale images may show false defects without the context that color provides.
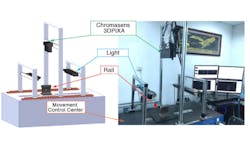
To address these issues, they developed an unsupervised saliency detection method that focuses on the unique features in an image. They implemented their method using a binocular line-scanning system comprising a Chromasens (Konstanz, Germany; https://chromasens.de/en) 3DPIXA camera coupled with a Chromasens Corona II line scan light.
The Chromasens camera integrates 2D color images and 3D profile information, and it can reach an optical 3D resolution of 70 µm/pixel, maximum acquisition speed of 1.4 m/s, and line rate of 21 kHz. The camera has a height resolution of up to 0.55 µm and 2D resolution up to 5 µm.
By integrating the two 2D image perspectives and rectifying them into one image with 3D height information, the system helps distinguish between dirt and actual defects, such as scratches, on a rail surface, explains Yingzi Lu, sales manager of the greater China region for Chromasens. “Just the one camera can give you the two images you need, and the speed is very quick,” she says. The camera’s ability to capture deep height resolution helps it depict the curved and deep sides of a rail accurately, she adds.
In addition to the binocular line-scanning system, the researchers also created a global low-rank and nonnegative saliency algorithm, which allowed them to calculate depth information with a resolution of 14 μm in a range of 52 mm.
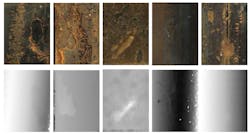
They tested their experimental system using rail data from two datasets. First, the researchers collected defect data from 20 rail segments taken from an actual production line. They used this information to create a database of rail-surface images that includes defects, such as rolling scars, scratches, pits, and holes. For each defect, the database includes an image of the defect and a corresponding depth map.
The second dataset is a public railway image dataset, primarily composed of grayscale images.
To implement their method, the researchers obtained 2D image and 3D profile information from the rail images using the binocular line-scanning system. They used the algorithm to create a saliency map of the 2D image and then determined the outlier region of the 3D profile based on the saliency map and characteristics of the rail surface. They then fused the 2D and 3D results.
They compared their method to 15 other state-of-the-art methods for rail surface inspection using two scenarios: either the 2D and 3D images or the grayscale images. In both cases, the researchers concluded that their method outperformed the others.
About the Author
Linda Wilson
Editor in Chief
Linda Wilson joined the team at Vision Systems Design in 2022. She has more than 25 years of experience in B2B publishing and has written for numerous publications, including Modern Healthcare, InformationWeek, Computerworld, Health Data Management, and many others. Before joining VSD, she was the senior editor at Medical Laboratory Observer, a sister publication to VSD.


