Optical testing system calibrates cameras
To properly determine the image quality obtained from a lens, CCD sensor, or camera system, designers must measure the spatial-frequency response of the system. This measurement, known as the modulation transfer function (MTF), establishes how well the contrast of an image is preserved in percentage terms after the image passes through a lens, CCD sensor, or complete imaging system (see Vision Systems Design, May 2002, p. 29). Although these performance characteristics are well known and well defined, many analog and digital camera manufacturers do not thoroughly characterize their cameras, leaving systems integrators to determine whether their cameras of choice are suitable for specific machine-vision applications.
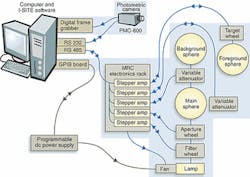
"To properly determine MTF, the minimum resolvable contrast, and the noise power spectrum," says Jonathan Everett, optical metrology product manager at Optikos (Cambridge, MA; www.optikos.com), "requires that each camera be subjected to rigorous optical testing." Optikos has developed an integrated system for imager test and evaluation (I-Site) system that integrates precision motion and illumination control with the company's proprietary I-Site image-analysis software.
Accurate targetThe proper testing of cameras mandates the use of highly accurate test targets and illumination systems. In the design of its system, Optikos uses several laser-etched US Air Force target patterns available from companies such as Edmund Industrial Optics (Barrington, NJ; www.edmundoptics.com), Max Levy Autograph (Philadelphia, PA; www.maxlevy.com), and Sine Patterns (Pittsford, NY; www.sinepatterns.com) in its precision variable luminence and minium resolvable contrast sources to enable CCD vendors to make objective measurements of camera performance (see figure)."In this way," says Everett, "the intensity and spectral illumination of the target can be controlled to between 1% and 2%." Shutters driven by stepper motors under control of the host PC's I-Site software can accurately vary the intensities of the back and front illumination. Capturing accurate images from the camera under test demands that the camera outputs be captured at the highest resolution available.
"By increasing the sampling rate of these cameras, testers can make more accurate measurements," says Everett. "Other effects, such as frame-grabber jitter, must also be taken into consideration," he adds. To reduce these effects, the I-Site system uses the High-Def Accura board from Foresight Imaging (Lowell, MA; www.foresightimaging.com). With this board, the I-Site system can operate with pixel rates up to 150 MHz and can lock onto analog video sources with a 59-dB signal-to-noise ratio and ±0.5 ns of pixel jitter.
Updated softwareAfter images are captured, they are analyzed on the host PC by the I-Site software. Originally developed by Ealing Electro Optics Ltd. (Watford, Herts, UK) in Warp/OS2, Optikos updated this software to Windows NT, allowing the data captured from optical images or video cameras to be quickly analyzed and then displayed on the PC's monitor. These optical measurements include the MTF, the noise power spectrum, and the root-mean-square noise and signal transfer function of analog and digital cameras. As well, the I-Site software provides object linking and embedding interfaces, which allow system developers to create and test optical macro programs and import data to third-party packages such as LabView from National Instruments (Austin, TX; ni.com) and Microsoft Visual Basic and Excel.Everett says that the cost of such systems can be between $75,000 and $200,000 per installation, depending on user requirements. "Typically," says Ryan McDonough, Optikos marketing and sales specialist, "generating complete optical data for an analog or digital camera can cost a company approximately $1500." Armed with this information, however, optics manufacturers and camera manufacturers can improve their manufacturing processes as well as offer their customers much-needed performance characteristics.

