Vision system inspects tire wheel assemblies
Tire wheel assembly producers can ensure the integrity of their products thanks to a vision inspection system.
Starke Farley
In the past, automobile manufacturers purchased tires and alloy wheels from third parties, then mounted and balanced the tires onto the wheels in one of their own facilities to form a tire wheel assembly (TWA). Today, however, it is more common for third-party manufacturers to purchase tires and wheels from suppliers, mount and balance the tires, inspect the tire wheel assemblies, and then ship the completed TWAs to an automobile manufacturer.
Tires are marked with Department of Transport (DOT) codes that include information such as the plant where the tire was manufactured, the tire size, the tire brand, and the week and year that the tire was made. Under Federal regulations, each TWA producer is required to record the DOT codes of all tires for tracking purposes and possible safety recalls.
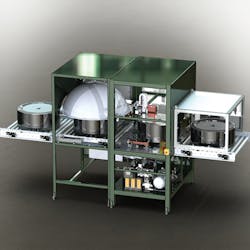
When one tire wheel assembler needed a system specifically for that purpose, Integro Technologies (Salisbury, NC, USA; www.integro-tech.com) developed a fully automated vision system called the Tire Guardian (Figure 1). The patented system enables the manufacturer to read and store DOT Codes from a TWA, verify the size, speed rating, manufacturer, and identify the arrow found on directional tires. It also determines whether a tire bead is properly seated on a wheel rim during the TWA assembly process, and ensures that the tire is correctly matched to the wheel.
The Tire Guardian is a modular PC-based system that can be taught to identify TWAs by storing their key physical and image characteristics on a database. This data is used by a PLC to control a variety of I/O and motion axes in the system, enabling TWAs of varying dimensions to be accommodated and allow image processing software running on the PC to identify key TWA features during the inspection procedures.
In a production environment, an unlimited number of tires can be combined with a particular wheel, and an unlimited number of wheels can be combined with a particular tire. By storing a database of TWAs, it is possible to teach the system the characteristics of the wheels and tires separately, after which the Tire Guardian system can inspect any combination of tire and wheel.
Sidewall identification
In a TWA assembly plant, wheels and tires are fed via conveyors from storage locations to an automated tire line where the tires are mounted onto vehicle wheels, inflated to the correct pressure and balanced. The finished TWAs are then ready for inspection and verification by the Tire Guardian system.
Prior to entering the system, the height of the TWA must be verified to protect the system from possible damage. To do so, the TWA is first conveyed into a staging station. There, an IL-300 laser distance sensor from Keyence (Itasca, IL, USA; www.keyence.com) mounted directly above the TWA projects a laser line light directly down onto the surface of the TWA. As the TWA moves through the staging station, the distance sensor measures the peak height of both the inner and outer tire sidewalls of the TWA. This data is then compared to pre-programmed values for the TWA which are stored on the PC database together with its known size.
If the values are within an acceptable range for the Tire Guardian inspection system, the TWA enters the system where the DOT codes, speed rating, manufacturer, size and bead seating of the TWA are identified. If not, the system stops and alerts an operator who can either verify that the TWA is correct and manually send it through the station or reject it, in which case the TWA will be conveyed through the station to a reject conveyor.
As the TWA is driven into the first of two vision inspection stations in the system, a pair of servo-controlled arms extends to a pre-programmed position that corresponds to the size of the incoming TWA. The conveyor then pushes the TWA against the arms, centering the hub of the TWA over a lifting assembly. Once centered, the arms are retracted and a pair of electric linear stages from IAI (Torrance, CA, USA; www.intelligentactuator.com) drive a pair of 3D laser scanners into a predetermined position from the surface of the top and the bottom sidewalls of the tire.
Once in place, the PLC instructs the lifting assembly to ascend. As it does so, a set of jaws inside the center of the assembly engage the center of the TWA to hold it in place as it is raised up from the conveyor into a position where the sidewalls can be imaged by the 3D scanners. A rotary servo drive from Wittenstein (Igersheim, Germany; www.wittenstein.de) then rotates the lifting assembly by 420o as the scanners project a laser line across the sidewall surfaces of the rotating tire, and the 3D scanners digitize the circumferential band that contains the DOT codes. An encoder mounted directly to the shaft of the lifting assembly allows both the top and bottom imaging cameras to acquire consistent and repeatable images even though the velocity and acceleration of the rotation may change.
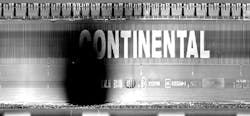
The 3D images captured from the laser profile sensors of the two sidewall surfaces are transferred over Ethernet through an Ethernet switch to a PC. The digitized gray scale images of the sidewalls of the tire are then flattened and unwrapped. This results in two long rectangular images, which can be more accurately processed than curved or circular images. Because the contrast of the gray scale images is dependent on the height or depth information contained within the 3D image, the black background of the tire can be distinguished from the black characters molded onto it.
Image analysis
The DOT code on the tire comprises a series of letters and numbers that need to be identified by the system. The three individual DOT letters at the start of the code indicate that the tire meets DOT safety standards. These are followed by three sets of letters and numbers that specify the plant where the tire was manufactured, the tire size, the tire brand and the week and year that the tire was made.
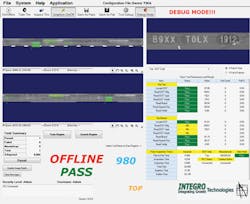
To analyze the images, the Tire Guardian system uses VisionPro software from Cognex (Natick, MA, USA; www.cognex.com). On the images of the tire sidewall, Cognex's PatMax geometric pattern matching tool searches for patterns within given regions of the two images to identify the location of the first three DOT characters in the code. Once the pattern matching tool has found a pattern which matches a known template previously pre-programmed into the system, the location of the DOT characters can be used as a reference point. From this point, the software locates three OCR search regions next to the characters from which Cognex's OCR tools can identify the characteristics of the tire (Figure 2).
The system then determines whether the tire bead is properly seated on the wheel rim. To do so, a blob analysis tool is employed to find dark areas in the sidewall of a particular size and geometry. Since unseated beads appear as dark blobs in the sidewall due to height differences from the camera, the system can use the blob analysis tool to determine whether there are a cluster of black pixels of sufficient size that indicate a bad bead seat (Figure 3).
Once the TWA has been inspected, the characters identified accurately and the bead seating verified, the PLC instructs the servo drive to stop rotating the TWA. The lifting assembly then lowers the TWA back onto the conveyor of the tire inspection station and retracts the wheel-clamping jaws. The chain conveyor then transports the TWA towards the second imaging station where the wheel shape and color are verified to ensure that the correct tire has been mounted to the correct wheel.
Shape and color
Before the TWA enters the second imaging station, the PLC moves a photoelectric sensor attached to an electric linear drive to a specific location in the station related to the diameter of the TWA. When the leading edge of the TWA breaks the beam of the sensor, the movement of the conveyor is halted, enabling the TWA to be centered under a 52in DL180LED dome light from Advanced illumination (Rochester, VT, USA; www. advancedillumination.com).
A PIA2400-17GM 5MPixel gray scale camera from Basler (Ahrensburg, Germany, www.baslerweb.com) mounted above the TWA is then triggered to capture an image of the wheel. The image is then transferred via an Ethernet switch to the PC for processing. First, a PatMax tool is used to locate the wheel center hub after which the outside of the wheel rim diameter is located using a circle find tool which uses multiple edge tools in a circular arrangement.
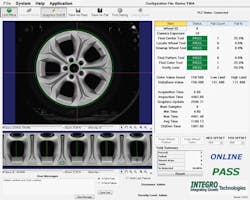
As before, the wheel image is unwrapped prior to processing, resulting in a long rectangular image which is easier to process compared to a curved or circular image. The unwrapped wheel spokes can then be analyzed by wheel geometry and wheel color tools (Figure 4).
Using the Cognex PatMax pattern matching algorithm, the geometric pattern of the wheel spokes is verified against data in the PC database to confirm that the correct wheel configuration has been married to the correct tire. Using a histogram tool, the system also determines whether the wheel gray scale color is between a set of limits. The low limit is calculated by subtracting a low offset from a retrieved value learned during training for that wheel, and the high limit is calculated by adding a high offset value to a retrieved value learned during training.
Once inspected, the TWA enters the output station, where the data acquired from the tire inspection station and wheel inspection station is used to determine whether the TWA should be accepted or rejected. To do so, the system compares the results obtained in the analysis process with pass/fail criteria stored in the PC database. The PLC then instructs the system to shuttle the TWA to one of two conveyors, depending on whether it has passed or failed the inspection process.
Having installed a number of Tire Guardian systems at tire wheel assembly producers, Integro Technologies is now developing Tire Guardian 2.0, a system designed to read text on the sidewalls of un-mounted tires without the need to rotate them.
Starke Farley, Senior Sales Engineer, Integro Technologies, Salisbury, NC, USA
Companies mentioned
Advanced illumination
Rochester, VT, USA
www.advancedillumination.com
Basler
Ahrensburg, Germany
www.baslerweb.com
Cognex
Natick, MA, USA
www.cognex.com
IAI North America
Torrance, CA, USA
www.intelligentactuator.com/iai-america
Integro Technologies
Salisbury, NC, USA
www.integro-tech.com
Keyence
Itasca, IL, USA
www.keyence.com
Rockwell Automation/Allen Bradley
Milwaukee, WI, USA
www.rockwellautomation.com
Wittenstein
Igersheim, Germany
www.wittenstein.de


