Automotive sensor precisely measures adhesive profiles
By Andrew Wilson, Editor, [email protected]
In automobile manufacturing, hinged body panels are mounted together by applying an adhesive bead to the outside edge of the other body panel with a profiled extruding nozzle. Robotically controlled, this nozzle deposits a line of adhesive around a predetermined track. Simultaneoulsy, the track’s height, width, and continuity must be measured and the shape and volume of the adhesive calculated. These parameters must meet a predetermined value set by the manufacturer to properly seal the panel.
Structured light is often the preferred method to measure the adhesive bead parameters. In such systems, a line light is projected at a known angle onto the seal and viewed from a different angle using a machine-vision system. Triangulation methods compute its height and width from which shape and volume measurements can be made.
“Since many systems designed for this task incorporate a single structured laser light and a single camera,” says Rudolf Resch, managing director of Quiss (Puchheim, Germany; www.quiss.com), “they are limited in their ability to properly follow the bead track.” Since the adhesive extruding nozzle, the structured laser lighting, and the camera housing are fixed in a single housing and the bead track may curve at angles of 90º, the complete system must also turn at 90º. In some cases, this can result in corner bead profile information being lost. This problem can be overcome by decoupling the extruding nozzle and the imaging system using an additional mechanical interface attached to the robot. “All this, of course,” says Resch, “results in additional system-engineering costs.”
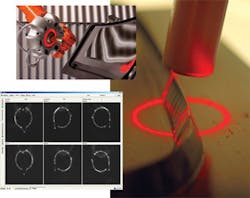
To overcome these limitations, Quiss has developed the RTVision.h, a sensor that uses a novel LED-based lighting approach and multiple cameras to continuously monitor adhesive bead application at speeds between 200 and 300 mm/s (see figure). Installed directly onto the extruding nozzle, the sensor does not employ conventional structured laser lighting but rather a ring of 18 segments of red ultrabright LED lights. Light from these LEDs is focused into a circular ring of light at a working distance of 12 cm from the part to be inspected. “By projecting a circular rather than a linear light on the adhesive bead,” says Resch, “the problem of cornering is eliminated, since there will always be a part of the light ring crossing the bead. Thus, the lighting and image sensor do not need to be decoupled to capture line profiles.”
To image the line profile of the projected ringlight, Quiss has incorporated no less than six monochrome CCD cameras into the head of the RTVision.h sensor. In this way, there will always be at least two cameras that can image the line profile of the adhesive bead. These images are then digitized using two PC-2 Vision frame grabbers from DALSA (Waterloo, ON, Canada; www.dalsa.com), each with three RS-170 inputs into an industrial PC.
Once digitized, the height profile of the adhesive bead can be calculated. Here again, Quiss has used some novel image- processing methods to perform this calculation. Because six cameras are used to image the part, there is no need to rotate the cameras to perform these measurements. Once captured, all six images can be displayed on the systems user interface.
“If, for example, the part being imaged is flat,” explains Resch, “the resultant images would all be circular since no profile would be present.” However, since the part is not flat, the resultant circular images are distorted by the amount of that profile. This can bee seen as triangular features within the images that represent height profile.
To detect the presence of noise, all six images are first thresholded. Any noise will then appear as bright spots within the image. To measure the height profile, several height measurements under the near triangular deviation of each image is measured. “Images that incorporate a large amount of noise are less heavily weighted than those that present less noise,” says Resch. “Similarly, height profile measurements between images are compared and should specific height profile measurements occur more often these measurements are more heavily weighted.”
In this way, the system can determine more exactly the profile height measurement for the bead seam. Once such height and width measurements are made, the system dynamically calculates the volume measurement of the adhesive, providing dynamic feedback to the extruding nozzle.

