The HEKUtip QC Assistant Delivers Precise Measurements
Scientists and technologists in laboratories use pipettes, fitted with disposable plastic tips, to dispense liquids into test tubes or other containers as part of a testing procedure. In addition to manual processes, the plastic tips also are used in large automated testing platforms.
Inspecting these disposable pipette tips is a crucial part of the manufacturing process, requiring very precise measurements, and this is why Ziemann & Urban GmbH (Moosinning, Germany), developed an automated inspection system for this process. “Even slight burrs in the injection mold or other defects on a pipette tip can mean that liquids picked up in the laboratory do not end up where they are supposed to, or that the liquid quantities are incorrect,” says Markus Urban, managing director at Ziemann & Urban GmbH.
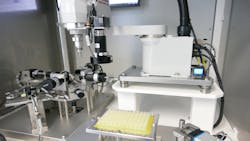
Ziemann & Urban’s pipette-tip inspection system, HEKUtipQC Assistant, can be deployed as a stand-alone unit or integrated with an automated system for producing pipette tips, HEKUtip, from HEKUMA (Hallbergmoos, Germany).The disposable pipette tips are produced in a high-speed injection molding process with clean room protocols. They are typically produced in trays of 64 or 96 cells and are usually inspected on an intermittent basis, such as hourly, because inspecting each pipette tip is not practical. “You would need a large number of cameras and automation around it, because for some measurements, you have to turn the pipette tips and look from different angles,” says Martin Welzenbach, senior application engineer at Ziemann & Urban, which specializes in vision inspection and test automation.
Ziemann & Urban has collaborated with HEKUMA for 20 years, designing successive iterations of the pipette tip inspection system. The current system was released in 2022.
Solving QC Issues
HEKUtip QC Assistant solves an inherent problem in pipette tip inspection. Manufacturers typically send pipette tips that fail inspection to an in-house measurement lab to figure out what went wrong. Turnaround at the lab can take up to 24 hours, halting production until the problem is isolated and fixed, explains Welzenbach.
To reduce the instances in which faulty pipette tips are sent to the lab, the new HEKUtip QC Assistant takes many types of measurements, leading to comprehensive results. This means operators in the plant will send fewer pipette tips to the QC lab for analysis, leading to less downtime in production, Welzenbach adds.
The measurements the system produces depend on a customer’s specific requirements but can include the internal diameter of a pipette tip, blackspot and bubble detections, absolute length and wobble circle, which measures the deviation of the pipette tip from the ideal center axis.
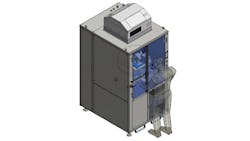
In addition to comprehensive measurements, another advantage of the system is the degree of automation, meaning that employees on the plant floor can operate the system. “You take this metal plate (holding the pipette tips) out of the production line, put it manually in the assistant, and then you close the door and press start,” Urban says.
Whether the inspections station is installed as a stand-alone unit, as described above, or integrated into the manufacturing line, it is typically positioned so that it can serve multiple manufacturing lines producing pipette tips.
The system is enclosed in a welded steel structure with dimensions of 1105 x 1580 mm. It includes a manual front door for easy insertion of trays of pipette tips and storage space underneath for supplies.
Incorporating Robotic Automation
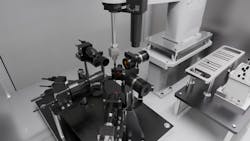
Once the trays reach the inspection station, a robotic SCARA arm—the smallest version—from Mitsubishi Electric (Tokyo, Japan) automatically removes each pipette tip from the tray and then rotates it as necessary to generate images.
“After the inspection, it's put back in the original position and this is done successfully with every pipette tip in the tray,” Urban says.
The system inspects a pipette tip in 5-10 seconds with the standard bottom and side view of the tip. Other views can be included, too, depending on a customer’s requirements.
Plant employees can watch the results in real time on a computer monitor as the inspection of a tray of pipette tips proceeds. Results are stored in a central Microsoft SQL database and can be detailed in a PDF report. A graphical summary of a 64-piece pipette-tip tray is produced within 10 minutes.
Designing with a Modular Approach
Since Ziemann & Urban’s engineers have been designing and manufacturing pipette inspection systems for more than 10 years, they did not run into issues integrating the machine vision components into the system.
However, engineers at the company found it challenging to design a system flexible enough to accommodate pipette tips that range in length from 20-20 mm. Diameters range, too, from 4-10 mm for the collar of the pipette tip (the larger end) and from 0.3-3 mm for the tip (smaller) end.
To address the need for flexibility, Ziemann & Urban’s engineers used a modular approach to the system’s design. Customers can choose a version with between two and nine cameras, with six cameras being the most common configuration.
The cameras used in the system are from the EXO series from SVS-Vistek (Gilching, Germany) with a GigE Vision interface, resolutions up to 25 MPixel and C-mount lens connections. The cameras are fitted with Pregius S sensors from Sony (Tokyo, Japan).
To provide adequate light for the images, Ziemann & Urban use telecentric illumination.
The C-mount telecentric lenses are from Canrill (Shenzhen, China) with a working distance of 65 mm and magnification of 0.74 or 2, depending on the FOV and specific camera model chosen.
Ziemann & Urban use green telecentric backlights from Canrill with a 3W LED for the sideview and an additional green ring light from Falcon Illumination MV GmbH (Untereisesheim, Germany).
Urban notes that even though the FOV is relatively small at 5.8 x 5.8 mm, the system detects flaw sizes up to approximately 1.7 µm.
Images are processed and measurements calculated on an IPC built by Ziemann & Urban using current Intel server boards.
The proprietary machine vision software, which Ziemann & Urban wrote using C++, is called ZU Vision. The company also incorporated its proprietary software modules for the user interface, communication, integration and report writing.
“The important thing is to make it usable for the customer,” Urban concludes.
About the Author
Linda Wilson
Editor in Chief
Linda Wilson joined the team at Vision Systems Design in 2022. She has more than 25 years of experience in B2B publishing and has written for numerous publications, including Modern Healthcare, InformationWeek, Computerworld, Health Data Management, and many others. Before joining VSD, she was the senior editor at Medical Laboratory Observer, a sister publication to VSD.


