Detecting flaws in boiler-wall tubing
Electric utility cuts downtime with robotic infrared linescan vision system.
By A. Ronald Jacobstein, Thomas L. Reilly, K. Elliott Cramer, and Shariff D'Souza
The inspection of large structures such as electric-utility water-wall boiler tubing is a major challenge for power-plant operators. The tubes line the inside of the boiler, and, because of the size of the boiler (typically 9000-m2 interior surface area), conventional nondestructive testing techniques such as ultrasonics, eddy currents, and flash thermography are of limited use. Excelon Power, a Pennsylvania-based electric-generating utility, tackled the problem by using an infrared-based imaging technique for the rapid inspection of the boilers to detect corrosion and reduce downtime.
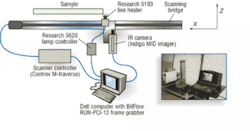
FIGURE 1. ThermTech testing system moves a thermal line source across the face of a boiler, followed by an IR imager at a fixed distance behind the line source. Quantitative data and images of wall thickness are reconstructed from measurements of the induced surface-temperature variations.
The nondestructive test method and linescan apparatus were derived from aerospace technology developed by NASA Langley Research Center and adapted for commercial industrial use by ThermTech Services, which provides a testing service using the system. The technique moves a thermal line source across the face of the boiler, followed by an IR imager at a fixed distance behind the line source (see Fig. 1). Quantitative data and images of tube-wall thickness are reconstructed from measurements of the induced surface-temperature variations. The linear heat source and IR camera are moved together at a constant velocity, which allows the rapid inspection of large areas, such as boiler walls. From the output of the IR camera, an image is reconstructed that yields the induced temperature changes at a known fixed distance behind the linear heat source.
OVERCOMING OUTAGES
Exelon Power had experienced outages as high as 30% of potential operating time at its Schuylkill Generating Station in Philadelphia, PA, USA. The Schuylkill Station's boilers are up to nine stories high and lined with water walls consisting of 1.5-in.-diameter carbon-steel tubes. The tubes are subject to leaks at locations where wall thickness has deteriorated from hydrogen attack on the interior surface of the tubes.
In particular, Exelon Power operations management knew there were problems between the fifth and seventh floors of one boiler and tried other test methods, including ultrasonic testing, but could not find all the flaws. Dave Stewart, Exelon Power operations manager, says his company initially removed 24 random samples, cutting out 1.5-ft-long tube sections from the likely problem location, and tested them for hydrogen damage. However, there was no evidence of damage in any of the samples.
ThermTech Services had initial success in locating flaws in 25 tubes in the problem area. Approximately 75% of these tubes had hydrogen damage within the area inspected, according to Stewart. Excelon Power replaced the tubes, but still found more failures. ThermTech then scanned the entire boiler between the fifth and seventh floors, leading to the replacement of 150 more tubes.
Stewart says that since the company began using the IR linescan method to inspect the tubing, outages have dropped to about 4%. "These leaks would force us to shut down a boiler for 24 to 36 hours, depending on the location of the leak in the tubing," Stewart notes. "In fact, we didn't have any water-wall tubing leaks caused by hydrogen damage in 2003 because we could identify potential leaks and replace the tubes before there was a problem. Use of the ThermTech system has been critical to the success of the Schuylkill Station."
This IR-scanning method has several advantages over conventional nondestructive-test techniques. The IR heater is held close to the boiler wall but does not contact it, enabling the inspection scanner to traverse moderately uneven surfaces or surface features, such as welds, without significantly affecting inspection performance. The method also enables very high inspection rates—in steel, speeds of 7.5 ft2/min can be achieved.
INSPECTION SYSTEM
The ThermTech system uses an Indigo Systems Merlin MID IR imager with a cooled indium antimonide (InSb) focal-plane-array detector. InSb was chosen over other IR detector technologies because of its high sensitivity and excellent spectral response in the operating wavelength band. The camera's specified noise-equivalent-temperature difference is 0.025°C when operating the detector in the 3- to 5-µm band. The Merlin MID produces images at both 30-frames/s output in an RS-170 format compatible with standard video equipment and 60-frames/s output in a 12-bit, RS-422 digital format.
The heat source is a Research Model 5193, which uses a halogen lamp backed by an aluminum reflector. The lamp provides a 20-in.-wide line of heat, reaching 90% of full operating temperature (as high as 1315°C) within three seconds from a cold start. The Research Model 5620 SCR lamp controller is a single-phase unit with an operating range from 0°C to 50°C. The scanner controller is a Contrex M-Traverse that offers a serial port for RS-422/425 communication and was preprogrammed to provide the continuous scan rates.
Data from the camera are acquired using a RoadRunner RUN-PCI-12 frame grabber from BitFlow, which provides 16-bit input and an acquisition rate up to 40 MHz. Data are stored at rates up to 60 frames/s in a Dell PC equipped with a 1.6-GHz Intel Pentium microprocessor. The image-processor board has 768 Mbytes of image memory available for storage and performs real-time floating-point processing of the incoming data. ThermTech Services developed image-acquisition and analysis software for the application written in C/C++ and based on Indigo System's Talon digital data-acquisition software.
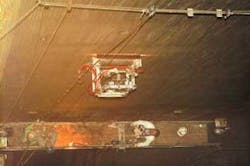
The heat source and the IR imager are attached to a robotic trolley that traverses the wall vertically (see Fig. 2 on p. 46). ThermTech built the robotic frame assembly containing the camera, heat source, and reflective arrangement. It is used where the boiler tubes form essentially a planar configuration upon which the rollers can ride, thereby maintaining a constant standoff distance. The entire unit is moved vertically via a simple hoist to draw the unit across the area to be inspected. ThermTech has developed and built other configurations to inspect nonvertical portions of the boiler tubing, as well as storage-tank walls. The design minimizes the need for extensive scaffolding and enables a significant reduction in the workforce needed for performing large-scale inspections.
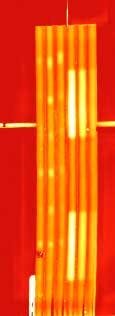
From a set of acquired images, a single image (bitmap) is reconstructed that represents the induced surface-temperature change at a fixed distance from the heat source. The reconstructed image is typically 320 pixels wide and as long as necessary, depending on the physical length of the subject, the speed of the scanner, and the image-acquisition rate (see Fig. 3 on p. 46). This reconstruction is done as postprocessing analysis of the data.
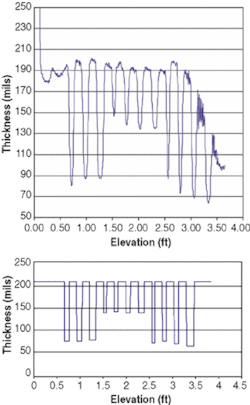
FIGURE 4. In a laboratory-test specimen, data acquired from a tube by the IR linescan camera (top) are compared to mechanical thickness data taken with a micrometer. There is a close correlation between measured and actual data.
Field tests, including the work at Exelon Power, have shown that the observed temperature of a discrete point on the tube surface is inversely proportional to the thickness of the material at that point and can be used to determine the apparent thickness of the tubing. Thermal data are collected in the PC and then converted into thickness data presented in a Microsoft Excel spreadsheet (see Fig. 4). Tube numbers are assigned to the vertical columns and elevations, and data are graduated in approximately 0.1-in. intervals and assigned to individual rows. These data provide a comprehensive overview of a boiler water wall or other structure and can be valuable input for predictive-maintenance decision makers, especially when successive inspection results are compared.
A. RONALD JACOBSTEIN is president and THOMAS L. REILLY is vice president of ThermTech Services, Stuart, FL, USA; ELLIOTT CRAMER is a senior researcher at NASA Langley Research Center, Hampton, VA, USA; SHARIFF D'SOUZA is a market segment manager at Indigo Systems, Goleta,CA, USA; [email protected].
Company Info
BitFlow, Woburn, MA, USA www.bitflow.com
Contrex, Maple Grove, MN, USA www.contrexinc.com
Dell Computer, Austin, TX, USA www.dell.com
Exelon, Kennett Square, PA, USA www.exeloncorp.com
Indigo Systems, Goleta, CA, USA www.indigosystems.com
NASA Langley Research Center, Hampton, VA, USA www.nasa.gov
Research Inc., Eden Prairie, MN, USA www.researchinc.com
ThermTech, Services Stuart, FL, USA (772) 225-2731


