CONSUMER PRODUCTS: Telecentric lenses and smart software team for bottle inspection
Manufacturers of glass and plastic bottles striving to increase the quality of their products often enlist the help of system integrators when automating their production processes. In building this equipment, engineers must develop systems that can accommodate different product types while simultaneously achieving ease of reprogramming by those unfamiliar with machine-vision algorithms.
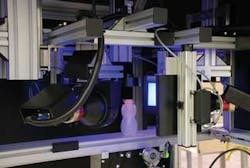
In the development of its latest neck gauging and sidewall inspection system, the NB Advanced Inspection System, integrator CIVision (Aurora, IL, USA; www.civision.com) has designed a system that uses off-the-shelf cameras, lenses, and lighting components as well as touch-screen-based auto-training software to ease the task of reprogramming the system (see figure). Like many automated systems, the NB inspection system is based around a high-speed conveyor that transports bottles into a machine-vision inspection station.
Using 5-Mpixel GigE cameras and telecentic lenses, backlit bottles are inspected for threads, defects, cracks, and blisters using CIVision’s NB inspection system.
“To check the surface of the neck for planarity and detect molding flash,” says Scott Stone, marketing director of CIVision, “the bottle is imaged using three GC254 5-Mpixel, 15 frames/s CCD-based GigE cameras from Prosilica (Burnaby, BC, Canada; www.prosilica.com), each positioned 120° around the circumference of the bottle.” To increase the contrast of the outline of images captured by these cameras, the bottles are backlit from all three angles with three BL6X-10 white 6 × 6-in. backlights from Metaphase Technology (Bensalem, PA, USA; www.metaphase-tech.com).
To increase the accuracy of the system, CIVision has employed telecentric lenses on each of these three cameras. Using 70-mm telecentric lenses with 0.125x magnification from Edmund Optics (Barrington, NJ, USA; www.edmundoptics.com), the smallest variation the system can detect is 0.005 in., which, according to Stone, is repeatable to within 0.005 in., more than an order of magnitude better than would be capable with a conventional camera lens. “By using this optical system, the system can resolve approximately 0.01 in. per pixel across the field of view of the bottle,” he says.
As images of the bottle are separately illuminated and captured by each of the cameras, they are transferred over Gigabit Ethernet to the system host PC. Here the system must verify that threads in the neck of bottles are completely formed and not notched, and that the neck is the correct shape and does not contain any molding flash. The system must also check the bottle’s sidewalls and bottom for embedded particulate contamination, blisters, and bubbles in the material, and window flaws such as swirls in coloring and imperfections in surface finish.
To accomplish this, Stone and his colleagues have integrated some of the Matrox Imaging Library (MIL) from Matrox Imaging (Dorval, QC, Canada; www.matrox.com/imaging) into their own machine vision inspection software called CIVCore. After outlining multiple regions of interest (ROIs) on each of the images, specific or multiple machine-vision tasks can be performed on each. For example, the system can be automatically programmed to determine the proper thread pitch and integrity in one ROI while another algorithm searches the surface of the bottle for any blisters.
Once individual products are programmed, the machine-vision functions and the type of product being inspected can be stored in a library. Should the user then require the system to inspect a different type of bottle in the library, the part is called from the library and the system automatically moves the cameras and lights to predetermined optimum positions for that inspection.
Perhaps more important is the ease with which new bottles can be programmed for inspection. In the system user-interface screen, Stone and his colleagues have used a touch-screen to make this easier. To program a new part for inspection, images of the part are first captured and displayed on the screen. Then, to highlight the area of interest to be inspected, an ROI is moved and sized over the part and the machine-vision function selected. Since multiple regions of interest can be sized over each part, multiple machine-vision inspection functions can be performed in each window.
“Because of the success and interest in CIVCore,” says Stone, “CIVision is starting a new OEM program later this year that will offer the software to OEMs.”

