Producing high-quality automotive parts requires carefully monitoring the manufacturing process to ensure that each part is correctly marked, meets specific tolerances, and is free from defects and scratches. To meet these criteria, many automotive parts manufacturers are deploying machine-vision systems so that once these parameters are checked, the results can be used to monitor and fine-tune the manufacturing process.
At its facility in Germany, ICS Industriedienstleistungen (Sondermaschinenbau) manufactures a variety of machined components for the automotive industry. To automate the inspection of these components, ICS called upon Buchanan Software (Suhl, Germany; www.buchanan-software.de) to develop a system capable of both measuring the tolerances of fastenings used to attach these parts and detecting any surface defects and markings (see figure).
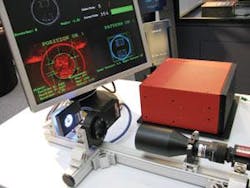
At Vision 2007 (Stuttgart, Germany), Buchanan Software showed such a system that was specifically designed to detect the proper fastening of automotive bolts. “In the design of the system,” says David Buchanan, president, “it was necessary to illuminate each part with both brightfield and darkfield illumination. To image the surface of the bolt, the part is illuminated with a red LED panel that acts as a brightfield illuminator. By imaging the bolt in this fashion, the entire image appears bright, and features such as edges are clearly visible. Using this image, features such as the bolt’s radius and position can be clearly determined.
To detect scratches or imperfections on the surface of the metallic part, the bolt is alternately lit with a blue LED ringlight that acts as a darkfield illuminator. “Because the blue ringlight illuminates the bolt from a point parallel to its surface, texture and part markings appear brighter, while most of the object appears dark.
“By illuminating the part alternately with dark- and brightfield illumination, both surface imperfections and part tolerances can be measured,” says Buchanan. As images are illuminated they are captured using a Guppy FireWire camera from Allied Vision Technologies (Stadtroda, Germany; www.alliedvisiontec.com) that is fitted with a telecentric lens supplied by Vision & Control (Suhl, Germany; www.vision-control.com).
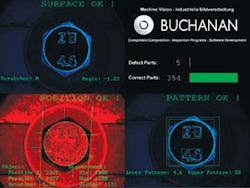
Surface imperfections include scratches (top left), position and radial measurements (bottom left), and OCR of part marks (bottom right). A statistical count of good and bad parts is also displayed (top right).
As images are digitized, they are transferred over the FireWire interface to a Vicosys 2300 embedded computer, also from Vision & Control. Capable of interfacing with up to four FireWire cameras, the Vicosys 2300 features a 1-GHz Celeron-based processor running Linux 2.4. After images are captured into the embedded computer, they are processed to determine specific image features.
To develop machine-vision algorithms with the Vicosys 2300, Vision & Control supplies its VCWin, a PC-based test program editor developed specifically for real-time image measurement. At the lowest level, says Buchanan, this program allows the developer to configure specific cameras for use with the processor, set camera parameters and transfer images to the 2300. To perform image processing functions, the software also contains numerous routines for blob analysis, Data Matrix code reading, surface inspection, dimensional measurement, and pixel counting.
“Using these commands,” says Buchanan, “the developer can design sophisticated machine-vision routines running on a PC in a Linux environment. Once these programs are tested and finalized, the program is transferred to the Vicosys 2300 using Vision & Control’s Vicorem remote protocol, where the program can run autonomously. “Because the VCWin software also contains routines to allow for RS-232-based PLC control, results of each machine-vision function can control other devices such as rejection mechanisms located on the plant floor. In the development of the system for ICS, Buchanan and his colleagues used VCWin development tools to analyze each bolt for scratches, position detection and measurement, and optical character recognition of markings on the head of the bolt.
A graphical user interface written in C# was used to display the results of each analysis. “Using off-the-shelf hardware and software components,” says Buchanan “allows us to rapidly develop and deploy machine vision systems which, depending on complexity can range from 8000 to 25,000 euros.”


