Automated optical inspection checks circuits
In-line machine-vision station inspects automotive electronics.
By R. Winn Hardin, Contributing Editor
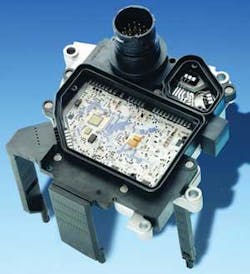
Ceramic substrates, such as those manufactured by Continental Temic, allow automotive control circuits to be placed close to the transmission and still survive the 150°C temperature common to automobile transmissions. An additional benefit of this hybrid technology is that it permits semiconductors to be packaged without housings, saving board space and cutting costs. In these circuits, fine wire bonds of gold or aluminum connect the semiconductor to the circuit. Each double-panel circuit contains approximately 600 wires (see Fig. 1 below).
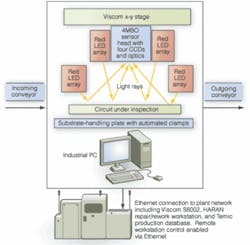
Because of the micron-sized defects that may occur, the number of inspection points involved, and the need for 100% inspection, Continental Temic process-technology manager Marcus Reichenberger rejected labor-intensive manual inspection in favor of three Viscom C6053BO bond-inspection systems installed on separate manufacturing lines. Each automated optical inspection (AOI) system contains a sensor head with four JAI Pulnix 1376 × 1024-pixel analog CCD cameras containing Pentax optics, surrounded by a variety of LED illuminators suspended from anx-y stage. A generic frame grabber with on-board memory buffer inside a network-accessible industrial computer running Viscom EasyPro image-analysis and statistical-process-control (SPC) software provides image analysis for the inspection system, and an automated substrate-handling system keeps all parts stable during the inspection process (see Fig. 2 below).
Productivity through connectivity
Continental Temic uses a ball-wedge method for attaching 32-µm gold wires and a wedge-wedge method for attaching 350-µm aluminum wires. These circuits must be completely and carefully inspected before installation because they could affect the performance and safety of an automobile.
Ralf Hollederer, an engineer in the process technology department at Continental Temic, explains: “The electrical test, which we also use, can only determine in a general manner if a connection exists or not. But it cannot determine when two wires come very close together. This can lead to short circuits.”
Another problem that can only be solved with AOI is determining the position of a solder ball on a semiconductor pad. According to the specifications, the ball should cover at least 75% of the semiconductor pad; however, this criterion cannot be measured electrically.
According to Hollederer, a peculiarity of bond inspection is the treatment of the pseudo-error/borderline defect, which typically has to be addressed by a technician during a rework process. “Due to process-related variations, we will never be able to achieve the extremely low parts-per-million figures obtained with the surface-mount-technology process,” adds Hollederer. “The input variables for AOI differ too greatly, due to the tolerances in the substrate structure, in the components, and in the bonding process itself. When all this is added together, the tolerances for the optical pattern for good parts is already very high.”
Viscom reduced rework time by installing defect-classification statistical-analysis software combined with automated defect notification communication to a downstream S6002 HARAN rework workstation. The repair workstation with graphic representation of the error location and the corresponding image permits technicians to quickly review borderline defects and determine whether rework is necessary. Defect-classification reports, communicated throughout the plant network via Ethernet connection from the bond-inspection workstation, also provide data for off-line SPC evaluation to improve the overall process while giving Continental Temic the protection of 100% product traceability.
Looking from all angles
To begin the inspection process, substrates come down standard conveyors to the workstation. A light-barrier sensor on the conveyor sends a “presence” signal via direct digital input to the bond-inspection station. The substrate enters the enclosure and is automatically clamped into place to prevent further movement. The image-acquisition system identifies the product type by reading its barcode or Data Matrix code on the substrate and begins the inspection routine associated with that circuit (see Fig. 3).
The Viscom 4MBO sensor head is composed of four megapixel cameras. Within the sensor head, one pair of sensors includes optics sufficient for low-resolution imaging, providing per-pixel spatial resolution of 8 µm at the predetermined standoff between sensor and substrate, while the other pair is configured for high-, or 5-µm, resolution. Which sensors are active depends on whether the system is inspecting an area on the circuit with long aluminum wires, solder balls (low resolution, wide-area field of view [FOV]), or fine gold wires (high-resolution, limited-area FOV).
Viscom system-designer Rolf Demitz explains that the sensor head is surrounded by red LED arrays positioned along both the optical axis (perpendicular to the substrate) and off-axis at 45° relative to the substrate surface. Demitz chose analog cameras with a Viscom frame grabber because image acquisition, transmission from camera to processor, and analog/digital conversion in these applications is 20% faster compared to direct-from-digital camera image acquisition and transmission.
Once the substrate is clamped and identified, the C6053BO positions the sensor head over the first region of interest (ROI) based on preprogrammed routines. The industrial PC in the bond-inspection system triggers a pair of sensors within the 4MBO sensor head to acquire an image. Separate signals are sent via a digital I/O card to the first in a series of red LED arrays. The system will eventually combine multiple pictures of the same image to enhance the sharpness of the final image data set.
Analog image data are transmitted from the sensor head to the frame grabber, where the information is stored temporarily in buffer memory, before transferring to the PC 1-Gbyte of memory, where EasyPro image-analysis software takes over. “Our frame grabber comes with four separate channels for four cameras, but some of our systems, such as those that make theta measurements and use our stereoscopic image option to measure wire loop height, require more than four cameras,” Demitz says. “In those cases, we use a multiplexer.”
Viscom makes the workstation’s industrial PC with an undisclosed motherboard and power supplies and components from other industrial PC manufacturers. It does this, Demitz says, because industrial PC parts are supported longer. “We try to deliver standard machines to the market, and we should be able to support them for a period of 10 to 15 years using the same configuration,” Demitz explains.
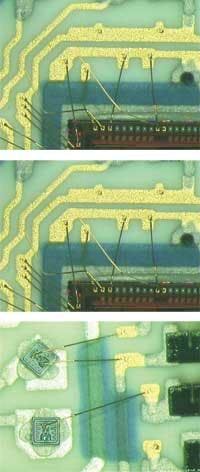
Demitz says the Viscom frame grabber includes on-board buffer memory because throughput is critical to the application, and the additional memory allows images to be processed in the PC while new images are acquired by the frame grabber. After multiple images are taken of each ROI, a proprietary algorithm analyzes the images pixel-by-pixel and enhances the edges of the fine wires, solder balls, and other features based on changes in subsequent images caused by lighting the substrate from different angles. After a final image is created, defects are identified based on semiconductor-inspection-specific macros that include several image-processing algorithms (see Fig. 4).
“With a wire-bond inspection, we might use a pattern match to find structures, but also edge detection and gradient/histogram analysis,” Demitz says. “These systems are not general-purpose machine-vision systems, and our customers appreciate that they do not have to program a specific inspection routine.”
After each ROI is inspected, the workstation stores the defect type and location in a Viscom SPC database on the workstation’s hard drive, along with an image of the defect. If the part requires rework, a signal is sent via SV70/SMEMA protocol to a downstream PLC for conveyance to the S6002 repair workstation. The workstation uses machine vision to read the part number and access the defect type and location along with the associated image and presents the data to a technician for corroboration and eventual repair.
Production data are also transmitted across the Continental Temic network for off-line statistical process control. The workstation can be controlled remotely across this network connection.
Features, advantages, benefits
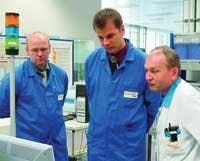
In the Continental Temic infinite drive-transmission-control module, wire bonds are connected to exposed semiconductor dye and must be visually inspected. “In the future, the requirements for quality control will continue to increase,” says Werner Dressel, Continental Temic engineer in charge of bond automated optical inspection (right, reviewing inspection data with Viscom AG division manager NP Rolf Demitz and Viscom division manager, strategic development, Christian Faber).
“The wire thicknesses will decrease even more, and we cannot exclude the possibility that aluminum also will be used in the thin-wire-bonding sector. The number of wires will also increase, and the components will be installed even more densely on the assemblies. There is simply no alternative to automated optical inspection,” he says.
Company Info
Continental Temic,
Nuremberg, Germany
www.temic.de
JAI,
Copenhagen, Denmark
www.jai.com
Pentax,
Hamburg, Germany
www.pentax.de
Viscom,
Hannover, Germany
www.viscom.de


