Smart cameras perform glass inspection
Glass manufacturing is a competitive industry. Should any errors occur in the process, the cost of replacing a customer’s product can be very high. Because of this, stringent quality control and inspection procedures need to be applied to ensure that no cracks, scratches, bubbles, or dirt particles are present. In the past, this procedure was performed manually and, in the case of large panels of double-glazed glass, required workers to climb ladders to ensure no defects were present.
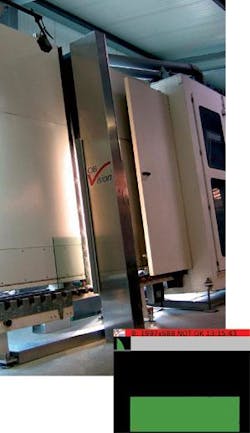
These problems are now solved by the OBV-Scan glass-inspection systems from OB Vision (Berlin, Germany; www.ob-vision.com). The company has developed a fully automated system capable of inspecting glass as it moves through the production process (see figure on page 12).
In OB Vision glass-inspection system, eight area-array cameras are mounted vertically in an industrial enclosure (top). As glass moves along the production line, images are captured and analyzed within the cameras and displayed on a PC (bottom). Here, such errors are displayed in red.
“By using multiple board-level cameras mounted in an industrial enclosure instead of an off-the-shelf PC-based system,” says Steffen Grossert, managing director of OB Vision, “we can significantly reduce hardware complexity. This allows us to provide a very robust, compact, easy-to-use and affordable inspection system.”
To detect glass defects, 8 to 12 VCSBC4018, 640 × 480 single-board cameras from Vision Components (Ettlingen, Germany; www.vision-components.de) running at 32 frames/s are mounted vertically within the scanner housing. Since the glass panels move at variable speeds of approximately 1 m/s, image acquisition is controlled by a motion sensor connected to the fast trigger interfaces of the VCSBC4018.
To analyze the captured images, engineers at OB Vision programmed a 400-MHz Texas Instruments (TI) TMS320C64 DSP in C++ on each of the cameras to perform edge detection and blob analysis using its Code Composer software. The architecture of Vision Components’ real-time OS allows for parallel image acquisition and processing at full frame rates. Thanks to the high performance of the TI DSP, full image analysis can be carried out while the glass panels move through the station. The results of the image processing provide details about any defects that are present on the glass.
After completion, all data are transferred over the cameras’ 100-Mbit Ethernet interfaces to an industrial PC, which merges and visualizes the data and records the results. An overview screen in the inspection station instantly shows any defects on the glass. Areas where no errors occur are displayed in green, while red areas highlight the size of large scratches on the glass. Minor scratches are also highlighted in yellow, while any bubbles present are displayed in purple. A mature user interface ensures that the inspection system requires only minimal manual interaction, and the production flow is not affected. Since manual checks are thus rendered obsolete, the automatic inspection system even accelerates the work process.
All results, including the images containing the defect information, can be remotely accessed over Ethernet via a user-friendly Web interface. The integrated statistics function provides an overview of the production status and the achieved quality. Thereby, the number of defects, defect types, and speed of the production line can all be remotely analyzed and used to provide feedback for the upstream manufacturing process.
After running an OBV-Scan system for more than one year at Oder-Glas in Müllrose, Germany, Christian Dahlick, managing director, comments, “Reliable defect recognition, which has been customized to our needs by OB Vision, allows our company to deliver glass with consistent quality, while at the same time minimizing the number of returns we receive. This could never have been achieved using traditional inspection methods.”

