Checking plastic caps and liners
One of the major US companies making rigid plastic caps has a large manufacturing facility with 100 injection molding machines, 35 lining machines, and 17 decorating machines. Since the company designs and builds its own plastic cap molds, it offers design, engineering, and manufacturing services for its customers’ component pakaging needs.
Today, 90% of the caps the company sells are supplied with liners. To check the proper placement of these liners and the integrity of the plastic caps, the company has, with the assistance of Siemens Energy & Automation (Norcross, GA, USA; www2.sea.siemens.com), installed vision systems on many of its lining machines.
“Producing plastic caps in large volume at high speed requires a highly automated manufacturing process,” says Steven King, manager of applications engineering at Siemens. “In just one production line, injection molding and lining machines manufacture and line caps at rates up to 1200 caps per minute.” After the liner is added, the cap is moved via a pocket wheel past the inspection station, where each cap must be inspected to check if it is of the correct shape and not cracked, whether the liner is present, and whether the liner is cut, scratched, or dirty.
“Proper illumination of the plastic caps plays a critical role in obtaining an image with enough contrast to be used in automated image analysis,” says King. To check for the presence of the liner, Siemens placed one of its Nerlite LT430 infrared backlights behind the pocket wheel. Any part with a missing or cut liner will transmit a higher intensity to the system’s CCD camera, and, by simply setting a threshold based on this intensity, the part is either accepted or rejected.
To inspect for broken, out of round, scratched, or dirty caps requires the use of an additional three-tiered low-angle red LED ringlight. With three tiers of LEDs mounted at 75º to the optical axis, a Nerlite DF-150-3 acts as a darkfield illuminator, enhancing the contrast of surface features such as cracks or dirt that may be present. “Because caps are produced at the rate of 20 caps per second,” says King, “this LED ringlight is strobed using a PP600F Fast Pulse LED lighting controller from Gardasoft Vision (Cambridge, UK; www.gardasoft.com) that is controlled by a PC using an RS-232 interface.
As parts move around the pocket wheel and into the inspection station, they are strobed and captured using an 1100B 60-frame/s progressive CCD camera from Sentech America (Carrollton, TX, USA; www.sentechamerica.com). Video signals from this programmable analog camera are then digitized by a Siemens 0740 PC-based analog frame grabber, and the image is stored in the PCs memory.
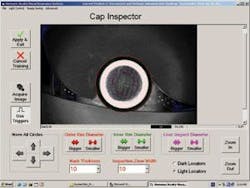
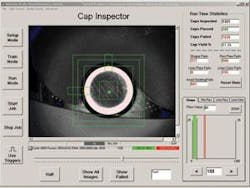
To analyze images of the caps, Siemens chose to use its own VisionScape 3.6 software. To make the system easy for the operator to set up and use, a Visual Basic user interface was set up, using standard Visionscape ActiveX controls, that allows the user to position three concentric red, green and magenta rings that respectively define the outer and inner edge of the cap and the area of the liner to be inspected (see figure).
As the inner magenta circle defines a region of interest within the center of the cap, simple histogram tools can measure the intensity of this region. Measuring the intensity of this histogram helps detect the presence or absence of the liner, since light intensity in this region will be higher if the liner be missing from the cap.
Although the magenta circle is used by the operator to define a region of interest within the center of the cap, it actually maps to a masked square region of interest that is used by the software to perform histogram analysis. Similarly, to check the plastic cap for cracks and dirt, the operator first defines the inner and outer edges of the cap with green and red circles. All three of these concentric circles are interpreted by the software to define four regions of interest that are used to check for absence of the liner or defects such as grease and debris, cuts or marks on the liner, cracks in the plastic cap and the concentricity of the cap itself.
As caps are inspected, the results of each inspection tool are presented to the operator in a barchart format. Each measurement resolves into a bell curve. Since most caps are good, the bell curve shows what is ‘normal’ for that measurement. The operator sets limits for this measurement simply by placing marks on either end of the bell curve, beyond which is considered abnormal or bad. Should the part be rejected, the vision system triggers digital output to a PLC that blows the cap off the pocket wheel into a reject bin. Overall statistics show the number of caps inspected, those that have passed and failed, and the type of defect that has occurred.


