Glass vial manufacturer’s vision system allows 100% inspection
Worldwide Glass Resources (Vineland, New Jersey, USA; www.wwglassresource.com), a manufacturer of glass vials in different shapes and sizes for a variety of applications including COVID-19 test kits, needed to achieve 100% dimensional inspection of glass vials. Prior to installing the inspection system, an employee would manually inspect the vials coming down the line. “The biggest problem was that when you have a person inspecting the vials, with all the attributes, the old way was to use hard gauges, ring gauges, thread gauges, and overall length gauges, and the inspector-packers have difficulty as vials are coming to them through a continuous running conveyor,” says Ed Poisker, Co-Owner and Operations Manager at Worldwide Glass Resources.
“Besides that, the human element does not allow for 100% inspection. People get fatigued. But, [adding vision systems] also allowed us to have a labor savings. At the time, we had one inspector-packer per machine, and currently we have one inspector-packer for two machines. Now they have less to look at because they are looking for cosmetic defects rather than dimensional defects.”
The company has several vial manufacturing machines and uses vision systems on all of them for dimensional inspection. It has a long-established relationship with Isotronic (Bad Königshofen, Bavaria, Germany; www.isotronic.de), a 30-year-old company founded to fulfill the high quality assurance needs of the pharmaceutical vial and glass packaging industry that has provided 10 vision systems to Worldwide Glass Resources.
The application for the most recent installation (about 1.5 to 2 years ago) uses the Isotronic VialChecker vision system to measure the mouth (open end) of a glass vial. Poisker explains that there are primarily two types of finishes: a screw thread finish and an aluminum seal finish, where aluminum is crimped on top of the bottle. “What we do with the system,” says Poisker, “is check the major diameter of the thread; the minor diameter of the thread; the start of the thread, which is from the top to where the thread starts; the neck length of the finish; and the overall diameter of the vial. Similarly for aluminum seals, what’s critical is the outside diameter seal and then the lip thickness of the seal. That’s predominantly what we’re looking for. You can also measure radii and angles of the finish and things like that.”
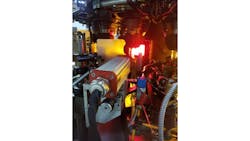
In this Worldwide Glass Resources installation, VialChecker includes the IDS camera model uEye CP 5250 (Figure 1) in a Colibri camera enclosure from autoVimation (Baden Württemberg, Germany; www.autovimation.com); LED lights from CCS America (Burlington, Massachusetts, USA; www.ccsamerica.com); an HMI; and a cabinet for the computer, sensors, analog I/O, and power supply.
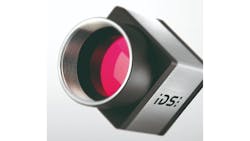
The IDS uEye CP camera (UI-5250CP Rev. 2) features an Ethernet interface for speeds up to 1.0 Gbps (Figure 2). The camera can deliver full GigE speed, and power over Ethernet (PoE) allows operation up to 100 m. The camera also features a CMOS color sensor from Teledyne e2v (Chelmsford, Essex, United Kingdom; www.teledyne-e2v.com). The camera’s frame rate is up to 52.0 fps, and its resolution is 1600 × 1200 pixels (1.92 MPixel) with 4.50 µm pixel size. It measures 29.0 mm × 29.0 mm × 29.0 mm and weighs 51 g. Sensor format (optical size) is 7.2 mm × 5.4 mm. It also features a GigE RJ45 screwable connector (Figure 3). In addition, the camera is fitted with a C mount lens mount.
The camera works in tandem with Isotronic’s proprietary software. VialChecker consists of VialChecker Geometry software and VialChecker Cosmetic software. Valentin Mayer-Eichberger, Isotronic’s Chief Operating Officer, says, “We have pretty standard computer vision algorithms that analyze the images. There are two categories: one is the geometric dimensional properties of the product (diameter, height, width, length, angles) and the other is cosmetic properties—surface defects like cracks, dirt, black spots, bubbles, and so on. We also have another sensor that measures glass thickness.” According to Mayer-Eichberger, the software was developed five years ago and released about three years ago. It is a standard product, and all Isotronic clients use the same software. “It’s a product that everyone uses, and we try to keep all of them on the same release.”
VialChecker can measure at speeds up to 120 vials per minute, although Poisker states the system for this application runs at 18 to 30 pieces per minute. The software is designed specifically for glass vial manufacturers, according to Poisker, and allows Worldwide Glass Resources to store parts, and there’s a library of tools to measure common attributes. “So, that’s the big gain for us—the operators have a wonderful tool to work with that allows us to see where we are in the process,” he says. VialChecker Geometry offers sub-pixel measurements up to 0.01 mm accuracy, while VialChecker Cosmetic offers accuracy to 0.1mm² for cosmetic checks.
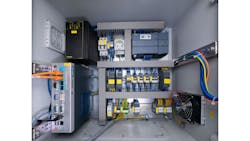
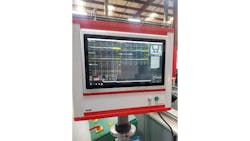
The VialChecker system also features a cabinet (Figure 4) furnished with a PLC for input/output, UPS for power supply, a computer, and other sensors and analog inputs. The HMI (Figure 5) is an industrial touchscreen and the HMIs that ship with the VialChecker system have between 22- and 24-in. screens.
The vial manufacturing machines at Worldwide Glass Resources are indexing machines, and they are connected to indexing conveyors. The machines take as input long glass tubes and output small glass vials. The camera in this application is mounted at a point right after the machine forms the head of a vial, and this is where the dimension inspection takes place.
The software the system uses allows Worldwide Glass Resources to choose a rejection location if a vial fails inspection. The rejection location, according to Poisker, is a set number of indexes (number of spaces) after the inspection location. Worldwide Glass Resources’ machine uses a pick-and-place robot (rotary and linear actuators), supplied by Ambeg (Berlin, Germany; www.ambeg.de), a manufacturer of machines for producing primary packaging from tubular glass, to place the part on the conveyor. If a vial fails inspection, the pick-and-place robot stops short of the conveyor and drops it into a reject bin.
The installation challenges for this system are common to most glass vial manufacturers, according to Poisker. They include oily and dirty environments, making it challenging to keep the lens and backlighting clean.
Mayer-Eichberger adds, “It’s quite a rough environment that we have to accommodate. There are gas flames quite close to the vision systems. The gas flames produce reflections in the glass vials. So, from a vision point of view, we fight a lot of reflections that don’t give us very accurate images. You have to tweak the system. For instance, if the backlight is too big and too close to the product, you have side lights into the edges of the glass. And, they act like a lens, so you won’t get a sharp edge. You really have to tweak the distance and the positioning of the backlight with respect to the product and to your lens.”
Poisker adds, “It seemed like Valentin and the crew nailed whatever they needed to as far as backlighting. Early on, they gave us a red backlight and, depending on the size of the vial, you wouldn’t get a clear image. So, you’d reduce the size of the backlighting by putting shields (Figure 1) in front of it to reduce the size of the backlighting.”
There are a few things on the horizon for Worldwide Glass Resources, including a move to 100% cosmetic inspection. Poisker explains that as with dimensional inspection, cosmetic inspection relies on an inspector-packer. “There is fatigue. There are long days, and the inspector-packer isn’t looking 100% at every single vial, so there’s risk that a cosmetic defect could get to the customer.” In that case, he says, hopefully the defects are just flaws and not cracks or chips. “So, for us,” he continues, “the improvement is going to be using Isotronic for cosmetic inspection needs. Currently, an inspector-packer looks at the parts, makes sure they’re good, and places them into the proper packaging. Cosmetic inspection is our segue into automatic packaging. There’s a lot of benefit when you get to that point.”
Worldwide Glass Resources recently took delivery of another VialChecker system. While the most recent install is measuring dimensions of a vial’s opening specifically, the new system will include two cameras—one to inspect the opening of the vial as described above and, Poisker says the second is for a customer, “that requires us to measure the inside diameter of the vial, so the only place to do that properly is on the conveyor.”
Perhaps most important to Poisker is that the vision systems employed at Worldwide Glass Resources have helped the company improve its production quality and process control. “It’s not only a good guarantee or good safeguard that the customer doesn’t get any defective parts, but it’s also a great tool for the machine operator,” says Poisker. “The machine operator sets up the machine, and you see where you’re drifting away from nominal, and it allows them to actually get to a point where they have less scrap and fewer defects.
The vision systems also allow operators to get job changes done faster. “In the past, they would produce a part, and they’d measure with calipers or hard gauges until they could get the parts within specification. Then they would finally get to run it. With the vision system, all the parts we produce are in a library. Get your windows in the right spot, and you’re off and running.”
Poisker also elaborates on the value of vision systems to companies. “I struggled early on with trying to build my own home-grown system. My advice is to seek out these packages that are available already. You’re going to save a lot of engineering time. You’ll get some wonderful support. Early on when we were smaller and didn’t have a lot of capital, buying our first two systems was probably a pretty big investment for us. I have no regrets doing that. In the big picture, that’s what your customers want to see anyway: 100% inspection of the parts. If I were to give any advice to anyone, it would be to make the investment and ensure your customer gets good parts.”
About the Author
Chris Mc Loone
Editor in Chief
Former Editor in Chief Chris Mc Loone joined the Vision Systems Design team as editor in chief in 2021. Chris has been in B2B media for over 25 years. During his tenure at VSD, he covered machine vision and imaging from numerous angles, including application stories, technology trends, industry news, market updates, and new products.
