IR cameras tackle PCB inspection applications
IR cameras are finding applications in PCB analysis to detect shots and thermal anomalies.
By Andrew Wilson, Editor
Those who consider using machine vision for infrared (IR) inspection are often dissuaded from using the technology due to the price of IR cameras. But, in some machine-vision applications, the need for sophisticated lighting and lighting-control systems can be radically reduced, making IR technology competitive with visible-light-based systems. The current cost of many IR detectors is now allowing the technology to be used in applications including industrial maintenance and electronics inspection.
In printed-circuit-board (PCB) analysis, in particular, conventional visible-spectrum-based systems often cannot be used to inspect possible shorts, vertical interconnect access (VIA) abnormalities, or incorrect component placement. In these applications, IR-based systems are permitting PCB developers to visualize defects and faulty designs, allowing them to compensate for these in future designs.
PCB failure
“In many cases the cause of PCB failure is unknown,” says Thoralf Meiburg, manufacturing manager of MAZeT, a custom PCB design house that uses IR cameras for quality control of its products. “Sometimes, this could be the result of a signal disconnection at VIAs located in a limited area underneath two ICs. To prove this, the board could be cut open, but this process is time-consuming and leads to destruction of the board.
“Since excess heat is often the cause of failure in the boards, a thermal imaging camera examines the situation by visualizing and measuring the board’s temperature distribution. The board exhibits a high temperature formation, which is partially drained off by a heat sink,” says Meiburg.
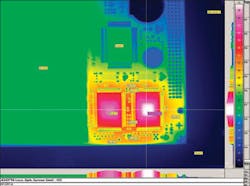
A VarioCAM high-resolution thermographic camera from Jenoptik Laser, Optik, Systeme provides a quick real-time 384 × 288-pixel overview of the large PC board to be examined. To virtually zoom into the details of the PC board, the VarioCAM is switched to th resolution-enhancement mode that increases the camera’s resolution to 768 × 576 pixels by means of an optomechanical scanning method. This provides high spatial resolution of board components and high local temperature resolution in the recorded thermographs, which helps pinpoint the suspected heat defects and produces temperature data of the board’s components (see Fig. 1).
Figure 1. MAZeT uses a Jenoptik VarioCAM high-resolution thermographic camera to provide real-time 384 × 288-pixel overview of a large PC board. To virtually zoom into the details of the board, the VarioCAM is switched to resolution-enhancement mode that increases the camera’s resolution to 768 × 576 pixels.
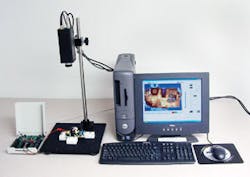
Thermal images are visualized directly and in the camera’s display. For automated board inspection, the camera can be controlled by a remote PC via different standard interfaces such as FireWire or RS-232.
“Thermographs of the board clearly show a 46 K excess temperature compared to the board’s ambient temperature. The excess temperature location can be narrowed down to the critical VIA area presumed to be defective. Another small but hot part of the board shows a temperature difference of only 36 K, but turns out to be not critical. Using this information can help eliminate these defects in future PCB designs,” Meiburg adds.
Locating shorts
“Short circuits also can be very difficult to troubleshoot,” says Richard Barton of OptoTherm. “While an in-circuit test may indicate that a short exists, often it cannot isolate the defect. Indeed, technicians and engineers can spend many hours locating a single short, particularly interlayer shorts.
“The process of finding shorts involves powering the board for a short period of time (for example 10 s) and then locating temperature increases resulting from the heat dissipated within the short due to IR losses. High-resistance shorts (greater than 10 Ω) usually exhibit temperature increases of at least 1°C. Low-resistance shorts dissipate smaller amounts of power (heat) than do high-resistant shorts and are somewhat more difficult to detect. A 0.5-Ω short, for example, may only exhibit a temperature increase of 0.2°C,” Barton adds.
When locating shorts, the OptoTherm EL system operates in differential temperature mode, displaying thermal images that represent temperature changes from the moment power was applied to the board (see Fig. 2). Using this approach, even a temperature change as small as 0.1°C is sufficient to identify a short. Additional features include automated board power control and automatic power disconnection to prevent damaging sensitive components located near the short.
Figure 2. OptoTherm EL system operates in differential temperature mode displaying thermal images representing temperature changes from the moment power is applied to the board. Even a temperature change of 0.1°C is sufficient to identify a short.
PCB defects such as defective ball-grid arrays and stressed components cannot be identified easily using conventional methods such as in-circuit test, functional test, automated optical inspection, and automated x-ray inspection. Many hours are often spent debugging boards with these defects, and often these boards end up in the scrap pile.
“Model board comparison (MBC) provides an alternative method of fault detection that can isolate these defects, thus filling the gaps between conventional debugging techniques,” Barton says. “An MBC test involves creating a thermal model of one or more known good boards by powering the board and analyzing the temperature changes that occur on each board and its components. Defective boards are then tested against the model to identify thermal differences that indicate defects.”
Using this approach, entire boards can be inspected at once, regardless of component density and without contact with the board. When troubleshooting scrapped boards, the most common defects are associated with power-to-ground shorts and bad components, which can be identified using MBC.
While conducting an MBC test, circuit boards must be rigidly and repeatably positioned with a sturdy camera stand and circuit-board fixture. In the OptoTherm EL system, board power is controlled with the system’s digital inputs and relay outputs. Boards are powered for the length of their bootup sequence or until component temperatures stabilize.
“MBC tests are also performed in differential temperature mode,” Barton says. “This improves the sensitivity of the test and minimizes the effects of ambient temperature changes from test to test. For these reasons, MBC tests can detect and locate subtle temperature anomalies that are nearly impossible to detect using other methods.”
Comparing images
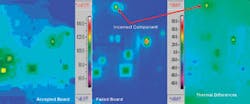
“Visual comparison of the thermal images from an accepted batch and from the failed batch often show that several components on the failed board were operating at significantly different temperatures than the identical components on the accepted board,” says Frank Bryson of Bryson Infrared Technologies. This was the case when one of Byson’s customers found that a batch of boards was failing quality-control testing.
“When the abnormally warm components on the failed board were observed closely, we found that while one of these appeared identical to its duplicate on the acceptable board, its markings revealed that it was designed to operate at a higher voltage than specified. This component was generating more power than the circuit design could tolerate, causing improper operation of itself and other components.
Figure 3. An acceptable board (left) is compared with a failed board (middle) and the images subtracted (right) The common color-vs.-temperature scale associated with these images can be used to visually determine the operating temperature of any component on either board.
This finding explained both the malfunction of the board and the temperatures differences that the thermal image displayed” (see Fig. 3). The image to the right displays the thermal differences between the failed and acceptable boards. This was generated by digitally subtracting the image of the accepted board from that of the failed board. The scale to the left of the image relates color to a plus or minus temperature difference, rather than the absolute temperature shown in the other images.
“Using this scale the operator can see if components on the failed board are operating at temperatures above or below their counterparts on the acceptable board. The component at the top of the image in Figure 3 was the source of the manufacturer’s problem. It is identical in size and shape to its proper counterpart, however, since it is designed to operate at a different voltage than the design specified it caused problems throughout various circuits,” Bryson says.
IR cameras examine flip-chip bonding
In the portable-electronics-product business there is a strong trend toward miniaturization; therefore, packaging density is increasing significantly. Flexible PCBs used in products such as smart cards, hearing aids, and LCD modules use flip-chip components with very small pitches. In these PCBs, anisotropically conductive adhesives are used, and the quality of their contact resistance measured. FLIR Thermacam SC3000 cameras perform these measurements.
At Satakunta University of Applied Sciences, researchers are using IR cameras to study current load on these circuits and measure generated temperatures. According to Paavo Jalonen, a senior researcher, the aim is to evaluate whether IR camera systems can classify the flip-chip contacts.
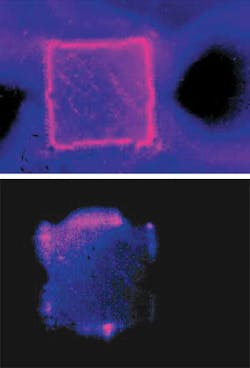
Daisy-chain flip chips were tested at 0.5 mA and imaged from the substrate side. The figure shows an IR image of thermal distribution of a flip chip of 80-µm pitch. The contacts in the flip chip are not on a straight line. While only a small amount of current can raise the temperature in a flip chip (bottom), if more current is applied, bad contacts can be clearly seen as pink areas (top). A.W.
