What’s the optimal assembly verification method for tough inspection tasks?
Comparing traditional machine vision, human inspection, photometric, and machine learning approaches for solving the hardest inspection challenges.
Hubert Kostal and Anne Corning
As electromechanical devices become more complex, assemblies contain many small parts and low-contrast elements that are difficult to assess and verify with precision at production speeds. If not caught, subtle defects—such as misrouted cables, missing screws, or misaligned connectors—can escape and end up in the hands of customers.
Incidents such as this can cause latent failures in the field, product returns, and damage to brand reputation. Such challenging inspection problems push the limitations of any visual inspection method—human or machine.
Quality inspection methods for electromechanical assemblies include machine vision systems, human inspection, and photometric inspection systems.An approach based on machine vision technology can be enhanced by applying artificial intelligence (AI)-based machine learning techniques.
By understanding the difference between human inspection, machine vision inspection, and the latest advances in photometric-based inspection techniques, developers can choose the best tool for the inspection task at hand.
The hard inspection problems
These difficult verification problems—where neither human inspection nor machine vision systems have been able to provide a satisfactory solution—typically fall into one or more of the following categories:
- Defects on DUTs (device under test) that are small, subtle, and low-contrast
- Complex assemblies, with many small components and details to be assessed—especially where inspection speed isdesired
- Defects that are unpredictable and occur randomly—in time and location
- Defects indicating quality or process issues that need to be quantified, trended/analyzed, and addressed operationally via system or processimprovements
- Production where inspection consistency and repeatability areimportant
- Production where absolute received quality is paramount for brand reputation/customerperception.
A growing need for precision
assembly verification
Product evolution over the last decade has increased device and process complexity—and increased the inspection challenges faced by manufacturers. Inspection methods must capture and analyze a vast number of details to find defects. This complexity typically forces tradeoffs between speed and accuracy.
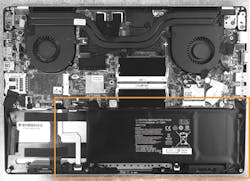
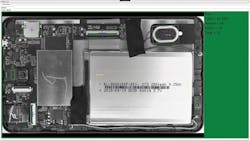
A primary objective of quality inspection is to identify assembly defects and failures prior to sealing the device (Figure 1). Identifying defective units while still on the production line prior to functional test reduces rework costs, escapes, and latent product failures.
Figure 1. Inspecting for the presence/absence of black screws on a black surface (laptop assembly), with the area of focus outlined in orange.
Latent failures can have severe negative consequences if they shorten the life of the device once in customer use. Because many assembly tasks still rely on human workers under increasing pressure to be efficient, the potential for defects is ongoing (Table 1).
The cost of a defect is much lower if detected prior to functional testing versus latent failures that emerge only after a device is shipped, when direct and indirect costs can rapidly escalate, to include:
- Returns, repairs, and warrantyclaims
- Customer dissatisfaction / loss of customerloyalty
- Damage to brand reputation and perception ofquality
For applications that need precision assembly inspection—from cell phones, to architectural glass, to medical devices—humans long had the advantage in meeting quality objectives. For less visually-demanding applications where speed was a priority, machine vision solutions have proven to be an effective option.
Advances in machine learning and photometry now offer alternative inspection methods suited to certain types of applications. Though each method has different strengths and tradeoffs, it’s the various demands of product quality, cost, and market position that determines the best option for a given application.
Human inspectors: the visual
quality standard
Humans possess remarkably acute visual capabilities combined with the ability to make judgements to extrapolate new error types and evaluate defects for relative severity. Human inspectors, however, are limited in their speed, are costly, tire easily, and are inconsistent. Their accuracy decreases precipitously over time and with level of detail.
Defects on devices like keyboards and keyboard frames (which exhibit visual patterns ranging from complex arrays to entirely random features) are more likely to be missed by humans who are easily fatigued. However, catching minute defects in complex arrays can be critical for preventing failures.
Machine vision: The power of automation
Machine vision systems offer significant benefits in terms of speed, repeatability and consistency, and in capturing data for further tracking, trending, and analysis.
However, a machine vision approach (defined here as a two-dimensional radiometric imager comprised of a CCD or CMOS image sensor), is best suited for applications with visually obvious and predictable defects, and with few anomalies that fall outside the scope of programmed points of interest.
Machine vision systems sacrifice visual acuity for speed, with low-resolution sensors that capture just enough image detail to detect a named error, but they are generally not designed to identify any defects that are low contrast, subtle, or unexpected. A machine vision system is most effective in highly-repetitive inspection applications.
Machine learning: Machine vision with
a better brain
To detect defects, machine vision systems rely on programmed algorithms that define what the system should be looking for. Parameters like part orientation, presence or absence, dimensions, and the angles of part geometries can be inspected based on a golden sample, or pre-defined specifications. Machine learning, by contrast, doesn’t rely on a priori knowledge, but applies pattern recognition using artificial intelligence algorithms.
A machine learning approach offers all the same advantages of a method based on machine vision—speed, repeatability, data capture—with the added power of being able to learn as it goes. Such systems are trained on a sample dataset until they yield the desired results, so the machine develops its own guidelines for identifying defects, enabling it to recognize even those types of defects it hasn’t seen before.
However, machine learning is still dependent upon the quality of data it receives, which depends on the quality and resolution of the images the machine vision platform can capture.
Photometric systems: advanced vision
Photometric systems provide the automation benefits of speed, reliability, and data capture. However, photometry-based cameras typically use CCD sensors with higher resolution and dynamic range compared to standard machine vision cameras, making them better equipped to detect small and low-contrast defects.
Originally designed for light measurement, imaging photometers capture extremely detailed images to allow fine-scale determination of light and color distributions.
For many inspection applications, the ideal CCD resolution of an imaging photometer is 16 or 29 MPixels, providing acuity equivalent to that of the human eye. The resolution of a standard machine vision camera’s image sensor, on the other hand, typically ranges from one to five MPixels.
Imaging photometers also capture a broader dynamic range: the number of grayscale values that can be discerned in an image. This enables a photometric camera to detect subtle variations on surfaces caused by shadows or reflections of light.
Imaging photometers are engineered to match human visual perception of contrast variations and can capture and classify small, low-contrast defects with extreme precision, while maintaining consistent processing speed and low image noise.
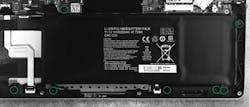
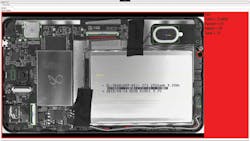
Photometric imaging can even detect defects so subtle that they go unnoticed by human inspectors, for example, light scratches on glass, gap variations between keys in a keyboard, or the absence of tiny black screws in a black surface (Figure 2). Photometry-based systems are able to capture and analyze an entire image at one time, excelling at identifying random or unexpected defects.
Figure 2. A machine vision system (top) can’t detect the difference and passes the unit, (shown in Figure 1), while a photometry-based system detects the missing screw (bottom), which if not corrected could allow parts to come loose and cause failure during shipment or consumer use.
Solving hard inspection problems
Referencing the aforementioned list of hard assembly inspection characteristics, the different inspection methods can be assessed:
1. Defects on DUTs that are small, subtle, and low-contrast. Human inspectors can spot these types of defects, but fatigue and inconsistency are a factor at production speeds. The high resolution, high dynamic range, and pixel-level analysis capabilities of photometry-based inspection meet or exceed human visual acuity to detect these subtle defects, with consistency and without fatigue.
2. Assemblies are complex, with many components and details. Again, the discernment of human inspectors is greater than that of a machine vision system, but the human eye can be overwhelmed by too much complexity and easily miss details. Photometry-based systems offer precision and speed.
3. Defects are unpredictable and occur randomly. The more complex an assembly, the greater the chance an error will occur during production. It also becomes more difficult to predict when and where it will occur. Human inspectors can apply superior judgment during visual inspection, using context to evaluate anomalies. They don’t need to be told where to look. However, their effectiveness drops at higher speeds as humans will develop patterns and miss variations.
A typical machine vision system must be programmed with static points of interest to know where to inspect and requires a highly-consistent production environment where parts don’t change significantly. Defects that are random in location, size and severity are the most difficult to identify.
While machine vision pattern-matching methods can discover some random defects, it is often technically difficult, or prohibitively expensive, to reduce the background “noise” due to positioning, lighting, and device variations.
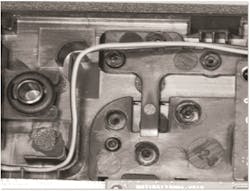
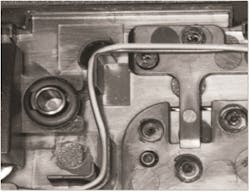
4. Defects indicating quality or process issues that need to be quantified, trended/analyzed, and addressed operationally. Unlike human inspectors, machine vision systems can process an unlimited number of data points simultaneously, apply values to quantify each data point, and process it quickly. Most machine vision systems document defects but have a limited ability to measure and grade levels of severity for applications where error may be acceptable below a given threshold. With their higher resolution and dynamic range, imaging photometers acquire more data from an image than a standard machine vision system, capturing a greater number of pixels and more gray levels to evaluate contrasting points of interest that may potentially indicate defects (Figure 3).
Figure 3. Imaging photometers acquire more data from an image than machine vision/machine learning systems, capturing more pixels and gray levels to evaluate contrasting points of interest that may indicate a defect, such as the misrouted cable in the top image.
5. Production requiring consistency and repeatability. Manufacturing and production quality control relies on consistent application of a defined set of inspection standards—including intra-inspector, inter-inspector, inter-line (intra-factory), and inter-factory consistency, without degradation over time. Photometric systems analyze images using precise spatial measurements, which can be compared to a standard tolerance value for pass / fail determinations (Figure 4), to ensure that inspections across operations and over time are evaluated using the same criteria, consistently and repeatably.
Figure 4. Radiant’s photometry-based INSPECT.assembly software performs multiple inspections in concert, detecting all assembly defects in a single image and measuring against defined tolerances for pass/fail analysis.
6. Production where received quality is paramount. When product quality is paramount, many manufacturers have typically used manual inspection by humans to identify any possible defects.
Machine vision systems cannot rival the perception of the human eye, easily missing subtle, but potentially significant defects. Imaging photometers, on the other hand, can leverage superior resolution and dynamic range to match, or even exceed, the visual perception of a person.
Comparing assembly inspection approaches
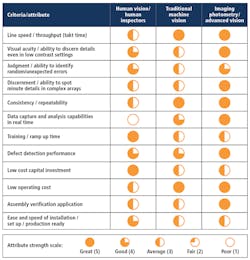
While human visual inspection offers accuracy, and machine vision and photometry-based advanced vision systems both offer the speed and repeatability of automated inspection, there are important differences. Figure 5 provides an in-depth comparison of all three options across a range of performance and operating parameters.
Figure 5. Comparison of assembly verification inspection methods.
Conclusion
When determining which assembly verification solution would be the best fit for a given application, consider:
- Complexity of the inspectiontask
- Desired speed (takttime)
- Level of accuracy and fine discernment required.
For high-complexity, high-precision applications—the hardest inspection problems—photometric systems are faster, more accurate, and more reliable than human inspectors, with greater precision, especially at high speeds and for low-contrast measurement tasks. While all automated vision systems can offer the advantages of speed, consistency, and data capture, photometric systems find subtle features that are not readily identifiable with lower resolution machine vision images.
Photometric imaging systems also excel at detecting random and unexpected errors. Machine learning-based solutions also provide this capability, but only to the extent that the system’s image quality allows.
Above all, photometric-based imaging systems identify defects that would otherwise pass functional tests and potentially cause latent failure. If customer satisfaction and brand perception are crucial, then absolute quality is what the market demands, and an advanced vision system based on photometry may be the best choice for the application.
Hubert Kostal, Ph.D., and Anne Corning, Radiant Vision Systems (Redmond, WA, USA; www.radiantvs.com)
