Machine vision speeds 3-D analysis of automotive parts
Plastec Precision Products (Clinton Township, MI) molds 35 different seat-belt components, including dust covers, plastic springs, buckle covers, push buttons, and mechanical covers for automobile manufacturers. Every day, the company produces between 12,000 and 20,000 parts.
To measure the height, width, length, location, distance, and diameters of sampled parts, the company had previously implemented a manual/mechanical coordinate-measuring machine (CMM) that required two setups per part - one for the x and y dimensions and another for the z dimension. This manual method was labor-intensive, subject to human error, and sometimes deformed the plastic parts during inspection as a probe or fixture touched the parts. Erroneous readings resulted, especially in parts such as springs, which naturally deform. To improve this process-control system, the company opted for a real-time quality-control system that could inspect more parts per hour and measure more parameters per part.
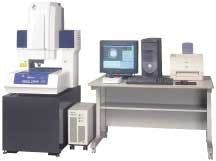
To build the desired system, Plastec switched from CMM inspection to a three-dimensional (3-D), Quick Vision (QV) 202 measuring machine from Mitutoyo America (Aurora, IL; www.mitutoyo.com). This machine boosted inspection throughput by eliminating the second setup stage because the QV 202 measures all three axes in a single setup. In fact, Plastec's inspection labor costs decreased by $60,000/year, inspection cycle time per measurement dropped from 40 to 10 minutes per 20-piece batch, and inspection throughput increased substantially.
The inspection machine automatically verifies the tight tolerance measurements on the complicated shapes of 2- and 3-in.square automotive components within ±0.05 to ±0.2 mm. Plastec measures the dimensional characteristics of height, width, length, location, distance, and diameter. It checks six to eight dimensions per part and makes two checks per axis. The company also inspects other parameters such as a part's edges. "In addition to throughput gains, the combination of noncontact and 3-D measurements reduced setup time by 83%," says Tim Evans, Plastec vice president of quality services.
Measurement setups using the previous manual CMM took one hour. This setup now takes ten minutes and uses half as many fixtures (see figure).
Prior to inspection, the parts are cooled for 20 minutes after molding to allow the parts to shrink to their final shape and size. Then, 20 parts are sampled out of 3000 pieces at three times a day for all 35 seat-belt parts. Previously the rate was 20 parts per 12,000 pieces. The operator loads the parts one at a time within the QV 202. Then, the machine selects a reference point and automatically performs all the measurements. During part referencing, the inspection settings are adjusted automatically. After inspection, the system sends measurement data to a Data Myte data logger from Allen-Bradley (Milwaukee, WI; www.ab.com) for control charting, queuing, and other quality-control measurements.

