Uses for machine vision
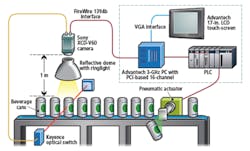
To better understand how a machine vision system might be used, imagine a packaging line with a steady flow of beverage cans. A machine vision system would include a camera trained on the line and proper lighting so that the camera can see the necessary details.
In this application, as cans pass down the production line at a rate of 20 per second, they are detected by an optical sensor that triggers the camera to capture digital images. Data from the camera is then used by an industrial PC to read the alphanumeric codes on the base of each can. Should cans with missing codes be detected, they are rejected by a pneumatic actuator.
When designing a machine vision or image processing system it’s important to decide what kind of result you want from the analysis of the image. The previous example provides pass/fail output with a decision made based on whether the code is present or absent, resulting in a passed inspection or a product rejection.
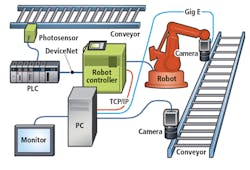
In addition to making good part/bad part-type decisions, image analysis can also provide gap measurements on spark plugs, output the character string from a date or lot code, or read the serial number from an image of a barcode. Image analysis can also provide location information to align parts in an assembly process or guide a robot to pick up or place an object in a certain position or orientation.
Machine vision technology cut its teeth in industrial applications in the semiconductor, electronics, and automotive industries during the 1980s and 90s. Today, reduced complexity and cost is driving rapid expansion into new non-industrial applications such as security and surveillance, clinical diagnostics and biometrics, as well as emerging areas such as autonomous vehicles, robots, and interactive advertising.
The reasons people use machine vision vary depending on the application. On high-speed production lines, speed is the primary driver. Machine vision provides consistent results while inspecting hundreds or even thousands of parts per minute. In clean room environments, machine vision prevents process contamination by humans. In hazardous environments, human safety is the driving factor. Machine vision is also great for closed-loop process control and robotic guidance.
One other key advantage of machine vision, especially in gauging applications, is the fact that there is no physical contact with the parts being measured. This prevents damage to parts and eliminates maintenance associated with wear and tear on mechanical gauge surfaces or automates a manual process such as gear inspection. Manual inspection on tactile machines takes several minutes to inspect each gear. With machine vision, a more detailed inspection can take place in half a minute or less.
Machine vision can also detect things that people can’t. With the appropriate camera resolution and optics, a machine vision system can easily inspect objects that would be much too small for the human eye to see. Infrared imagers allow temperature to be seen and various materials to thus be easily identified.
“Location” is an application where machine vision is used to report the location and orientation of a part. Machine vision systems locate parts in 2- or 3-dimensional space and provide position information for part alignment, guidance, or avoidance.
Machine vision systems also efficiently perform various types of inspections, verifying quality and assembly to determine whether items meet requirements and rejecting those that don’t. For example, Presence / Absence Checking for Assembly Verification verifies that part components are present and in the correct locations. Defect detection identifies defects and calculates defect characteristics such as position and size. Machine vision can also detect edge, surface, and other cosmetic flaws. Metrology and Dimensional Gauging calculates the distance between two or more points on an object.


