AIRCRAFT ANALYSIS: Active thermography speeds non-destructive testing of composites
Carbon graphic composite materials are now being used in the latest generation of commercial aircraft such as the Boeing 787 and the Airbus A350. Although the advantages of composites are obvious, these materials present new challenges for inspection and maintenance practitioners.
Classical inspection methods such as the tap-hammer or ultrasound (phased array or single probe) are still widely used for the inspection of composite structures on aircraft. Besides other limitations, such as the dependency of the inspection results on the experience of the inspector, these techniques do not allow for the scanning of large areas in an economically efficient manner. Inspection methods for large area scans, such as shearography or scanning acoustical microscopy (SAM) are not really established or suitable for practical use due to their complexity and limitations in performing on-site aircraft inspection.
Compared with these methods, active thermography enables large-area measurements to be performed and results presented as images that can be easily interpreted. Such active inspection systems are relatively easy to operate and do not necessarily require an experienced inspector to perform. Moreover, a single measurement can cover an area of from a few millimetres to several square meters. Measuring times are short; a measurement on a thin part will normally just take a few seconds.
Active thermography is based on inducing a heat flow in the part to be inspected. The propagation of the heat flow inside the object directly affects the temporal behaviour of the surface temperature. By imaging the object with an infrared camera, captured data can be analysed to show the internal structure of the part and any defects that may be present.
After performing an analysis of different available NDT techniques, Airbus (Toulouse, France;www.airbus.com) tasked Automation Technology (Bad Oldesloe, Germany; www.automationtechnology.de) to develop a non-destructive test system based on active thermography.
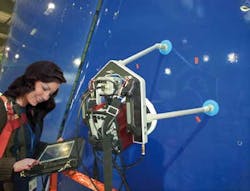
Automation Technology's system consists of a measuring head and a tablet computer. The measuring head contains an IRSmartEye 320 GEV infrared Ethernet camera with integrated control electronics and a halogen lamp heat source with integrated power electronics. All these components are mounted on a frame that contains three legs with vacuum-driven suction cups. These suction cups are used for fixing the measuring head to the surface of the object to be inspected and allow inspection to be performed on horizontal and vertical surfaces (see figure).
The performance of the system and the required inspection times were checked in a series of tests by personnel without a NDT background. During those tests, the complete side of an A320 rudder could be checked in 2.5 hours. Airbus has also planned to qualify and use the system for other inspection tasks on composite materials.
In future, aircraft such as the B787 and A350 will challenge developers to build systems that can check large fuselages for damage in a time and cost-effective manner. Moreover, damage caused by bird strikes, lightning strikes, the impact of objects during takeoff or landing, or a collision with a ground vehicle necessitate an immediate and reliable assessment on site to avoid expensive downtime. Since lock-in thermography methods produce digital images, measurements can be accessed by experts worldwide for their assessment.
Vision Systems Articles Archives

