A crash course in optical product design best practices
Two researchers published what was the culmination of years of studying and advising companies on product development efforts. In their Harvard Business Review paper, Six Myths of Product Development, they identified faulty logic that is often applied to product development and presented best practices for overcoming these false notions. These six best practices can help overcome the problem that most product development managers face: the struggle to bring projects to the finish line—on time and on budget.
How can we apply these general best practices more specifically to optical product design? Here are six ways to overcome challenges in optical product design.
BEST PRACTICE #1
Remain open to an evolving development plan.
How many projects have you seen where the requirements remained unchanged throughout the design process? The answer is likely not many, or none at all. So, the idea that you need to stick to a pre-defined development plan doesn’t make sense. When your team is innovating, and developing new insights daily, you’re better off acknowledging the fluid nature of project. Success is easier to come by if you establish workflows that position you to quickly and easily make any adjustments needed during your design phase.
BEST PRACTICE #2
Use iterative—not linear—design processes.
Linear workflows are inherently flawed when looking to innovate, to keep costs down and to get to market ahead of competitors. “A linear process flow can cause project overruns because test feedback is delayed, teams cling to bad ideas longer than they should, and problems aren’t unearthed until it’s expensive to solve them,” say Thomke and Reinertsen. With a linear approach, the cycle of prototype and redesign is often repeated many times before an optomechanical design is finalized. Instead, adopt tools that allow your team to iterate rapidly—to a qualified and highly validated design more quickly.
BEST PRACTICE #3
Experiment with smaller batches for faster feedback.
One cause of delays in product development is batch size. Some companies will test an optical product design with 20 new components using a physical prototype. The chances of creating a successful physical prototype on the first attempt are slim. The chance of isolating a problematic component in a physical prototype with that many new components is even slimmer. Companies that use improved simulation tools to dramatically lower the batch size of experimentation and testing are seeing astonishing results.
BEST PRACTICE #4
Quantify the cost of delays and factor it into your decisions.
If there’s no way to shake out errors in a design without having to build it, you have to build multiple physical prototypes. Each time people build prototypes, they discover something new—and have to redesign and repeat. Experienced managers build in allowances for this re-testing, but most don’t build in enough, and projects fall behind. Before you cut metal, you should get greater confidence that what you’ve designed is actually going to work. Eliminate the source of delays by streamlining your engineering team’s workflow by implementing technologies that facilitate communication and design validation.
BEST PRACTICE #5
Experiment early, rapidly, and frequently.
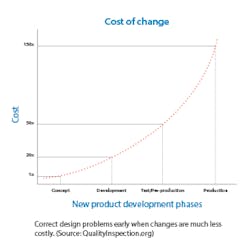
“Demanding that teams ‘get it right the first time’ just biases them to focus on the least-risky solutions,” say Thomke and Reinertsen. You’ve probably heard the expression “fail early, fail often.” Design changes become exponentially more expensive the further you get into the design process. So, by failing early and often, you are taking a smarter approach to your design process if you catch errors in the virtual environment rather than on the production floor. With the right design tools, you can find errors before they’re failures by simulating the optical performance of the entire optomechanical product in advance of creating a physical prototype.
BEST PRACTICE #6
Make information flows visible.
In product development, it’s often difficult to communicate critical information across different roles and teams. Mistakes are made when incomplete design information is shared among team members. An effective approach to combating this challenge in any cross-functional team is providing greater visibility into key data. Identifying mechanical errors—such as stray light, image contamination, or beam clipping—in a visible dashboard helps mechanical engineers resolve them more quickly.
The LensMechanix Optical Performance Summary chart displays performance data for spot size, beam clipping, and image contamination with simple pass/fail indications.
Companies developing cutting-edge optical products— from virtual reality to autonomous vehicles—can gain an enormous competitive advantage by following best practices in product development. With Zemax Virtual Prototyping, you can improve optical performance, cut your product development time dramatically, and reduce costs by creating a virtual prototype of a complete optomechanical assembly.
Learn how Zemax Virtual Prototyping applies these six best practices—and what it means for the optical products you design.


